Last updated: 2026-05-24
Table Explorer
Browse, filter, and edit table data with a powerful visual interface. Table Explorer lets you view data with pagination, apply filters with various operators, edit cells inline, add or delete rows, and export data in multiple formats.
Opening Table Explorer
There are several ways to open a table in Table Explorer:
From Object Explorer
The quickest way to view table data:
- Expand a database in the Object Explorer sidebar
- Right-click any table
- Select Select Top 1000 to browse data, or
- Select Edit Top 200 to open in edit mode
From Toolbar
- Click the Table Explorer button in the main toolbar
- Select a database from the dropdown
- Select a table from the list
- Click Open to load the data
Browsing Data
Once a table is open, you can explore the data using these features:
Pagination
Large tables are loaded in pages for performance:
- Page size - Choose from 10 up to 10,000 rows per page
- Navigation - Use the arrows to move between pages
- Jump to page - Enter a page number directly
- Row count - See total rows and current range displayed
Loading large pages
Rows appear in the grid as they arrive — you don't have to wait for the full page to load. While loading, a status indicator at the bottom of the grid shows progress (Executing query…, then Loading rows… X received).
If you choose a page size large enough that the entire page can't fit in memory (typically over 50,000 rows on wide tables), Table Explorer switches to streaming mode: rows are fetched on demand as you scroll. Inline editing is unavailable in streaming mode. If you want to edit values, reduce the page size first — a banner above the grid explains the same.
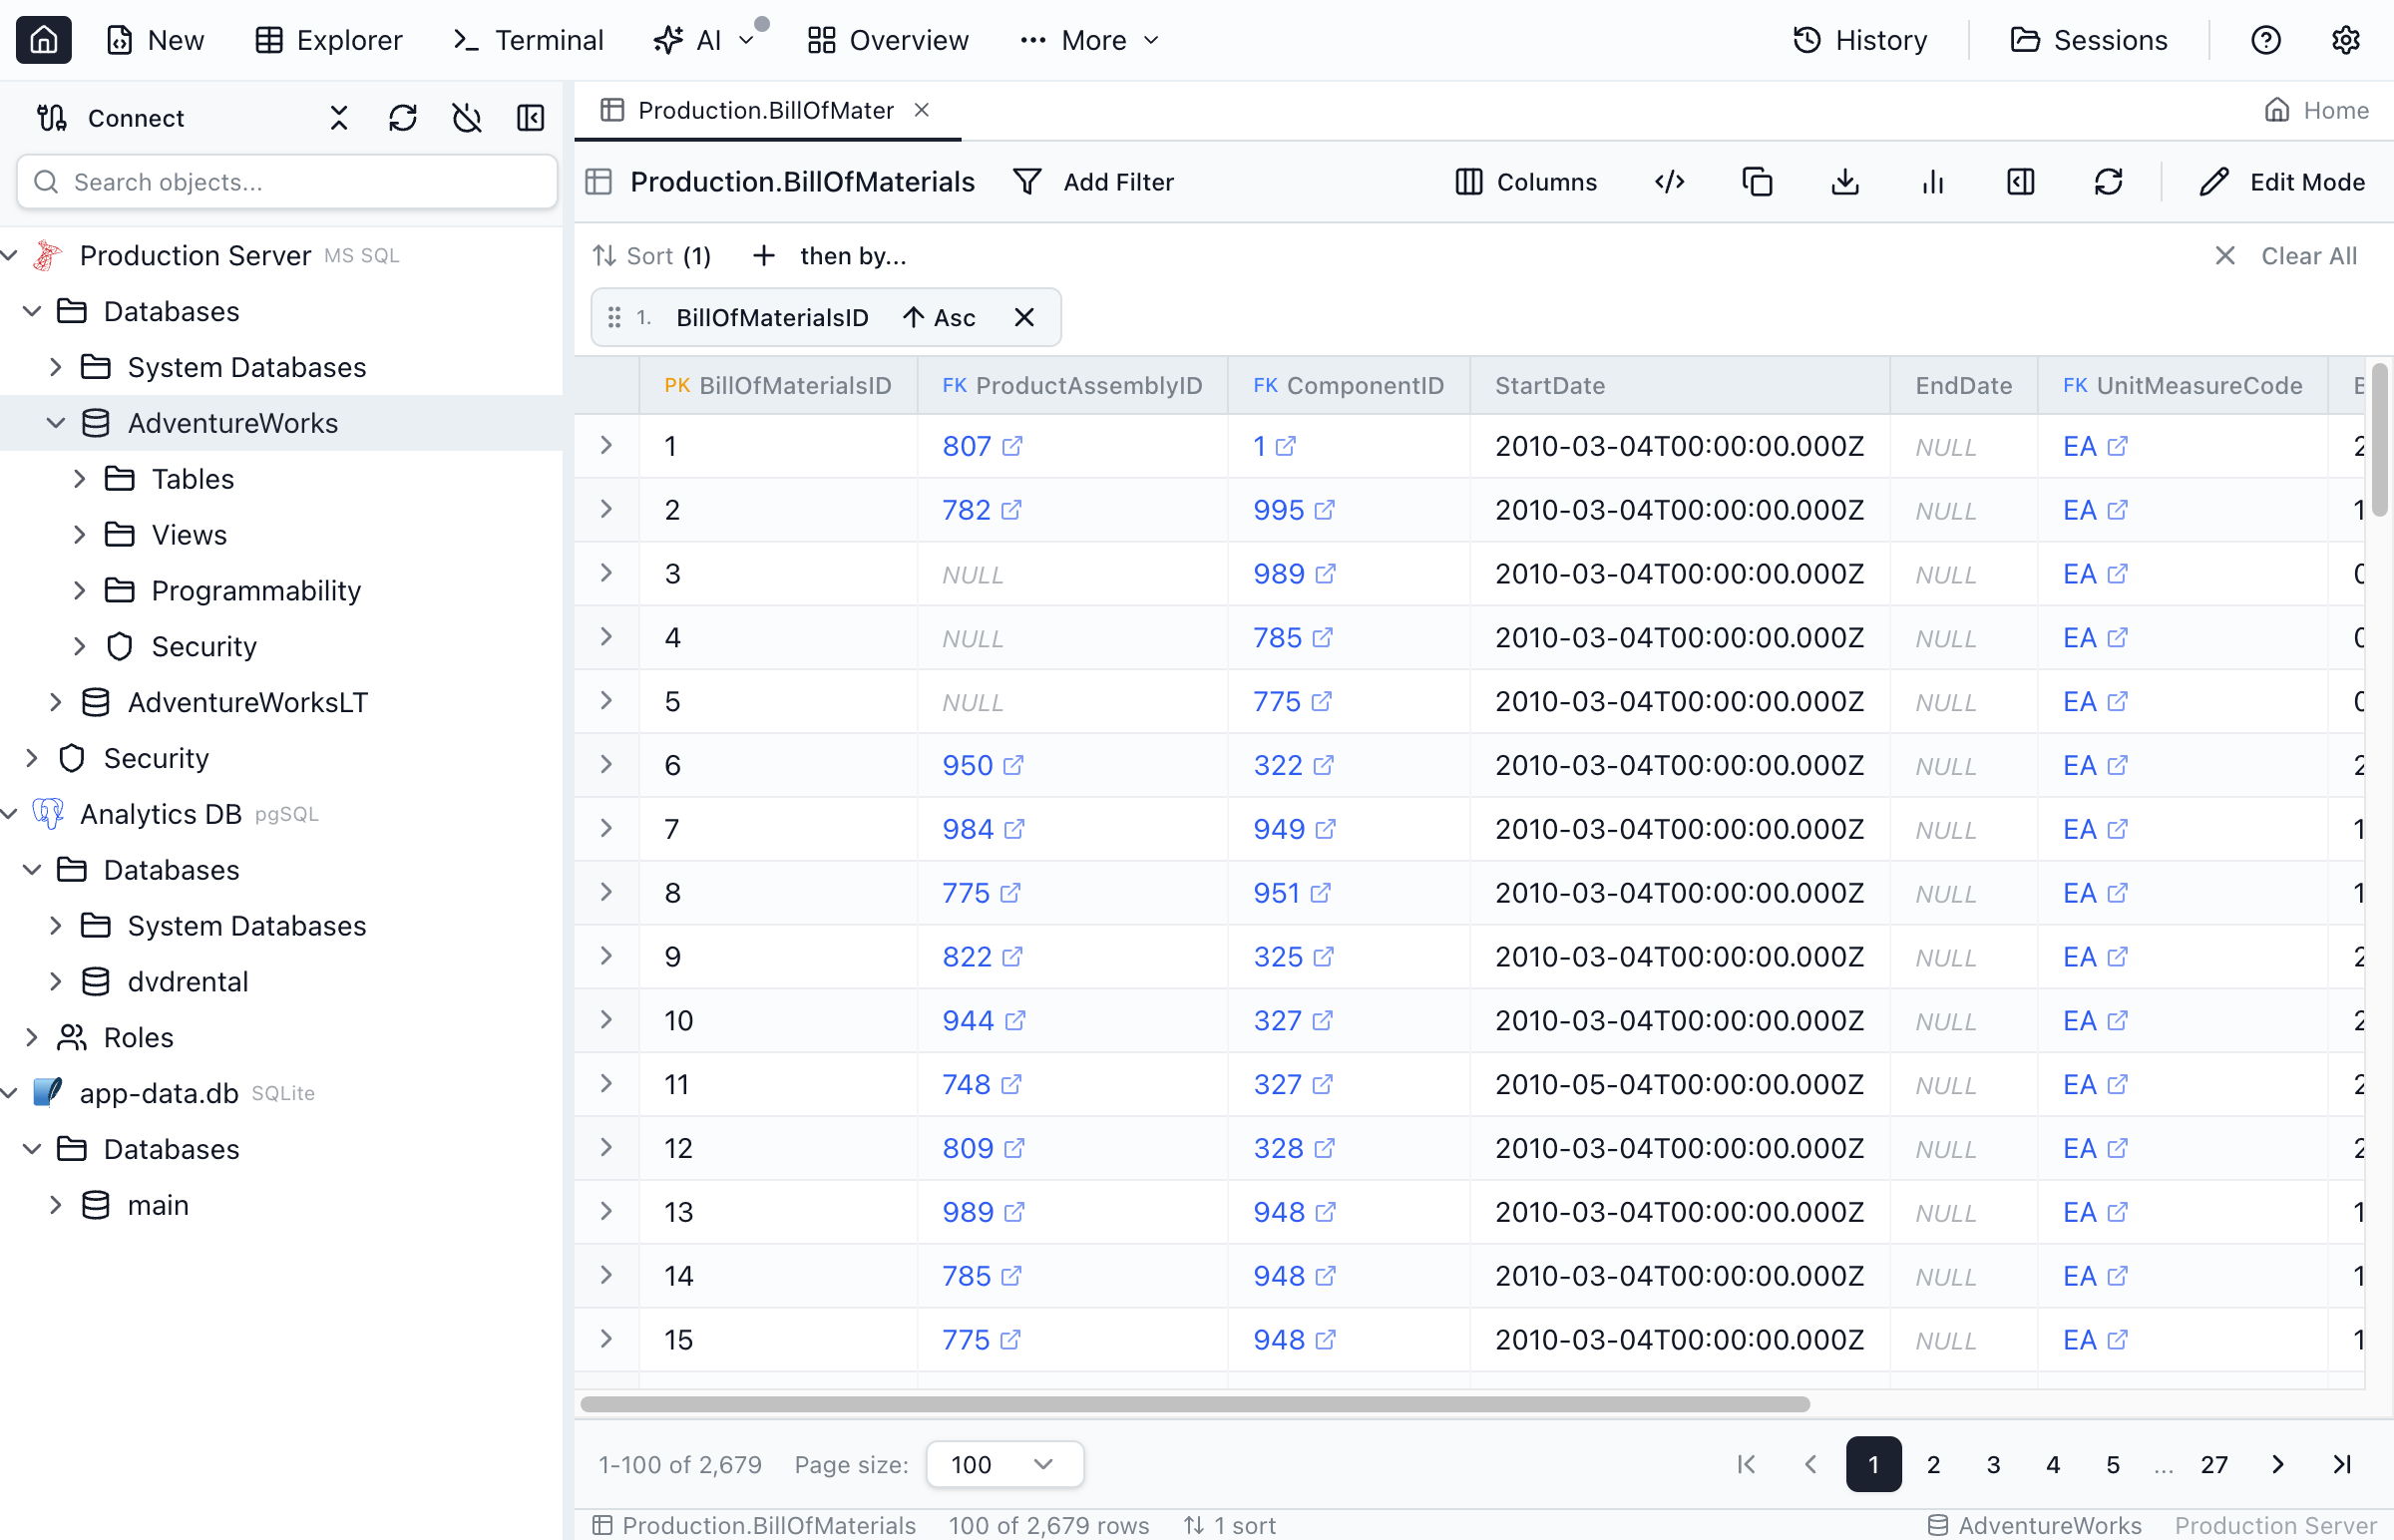
Column Sorting
Click a column header to add it to the Sort panel (ascending by default). Use the Sort panel to change direction, reorder sorts, or remove sorts.
- Click a column header to add a sort
- Multiple sorts are supported (reorder in the Sort panel)
Column Resizing
Drag the border between column headers to resize columns. Double-click a column border to auto-fit the column width to its content.
Show, Hide & Reorder Columns
Click the Columns button in the toolbar to show or hide columns and rearrange their order:
- Check / uncheck a column to show or hide it. Hidden columns drop into the Hidden section at the bottom of the list.
- Drag the grip handle next to a visible column to reorder it. The grid header order updates when you click Apply.
- You can also drag column headers directly in the grid to reorder them — clicking still triggers sort; only a noticeable drag (≥ 5 px) starts a reorder. Pinned columns stay anchored and aren't draggable.
The chosen order and visibility are saved per tab and restored on the next app launch.
Row Details
Inspect a single row in a details panel (available outside edit mode):
- Click a row to select it
- Use the row expander (>) to open Row details at the bottom
- Use the Row side panel button (|) to open Row details on the right
- Use the panel header buttons to switch between bottom and side layouts
- Drag the divider between the grid and the side panel to adjust the panel width
Filtering Data
Use the filter panel to find specific data without writing SQL:
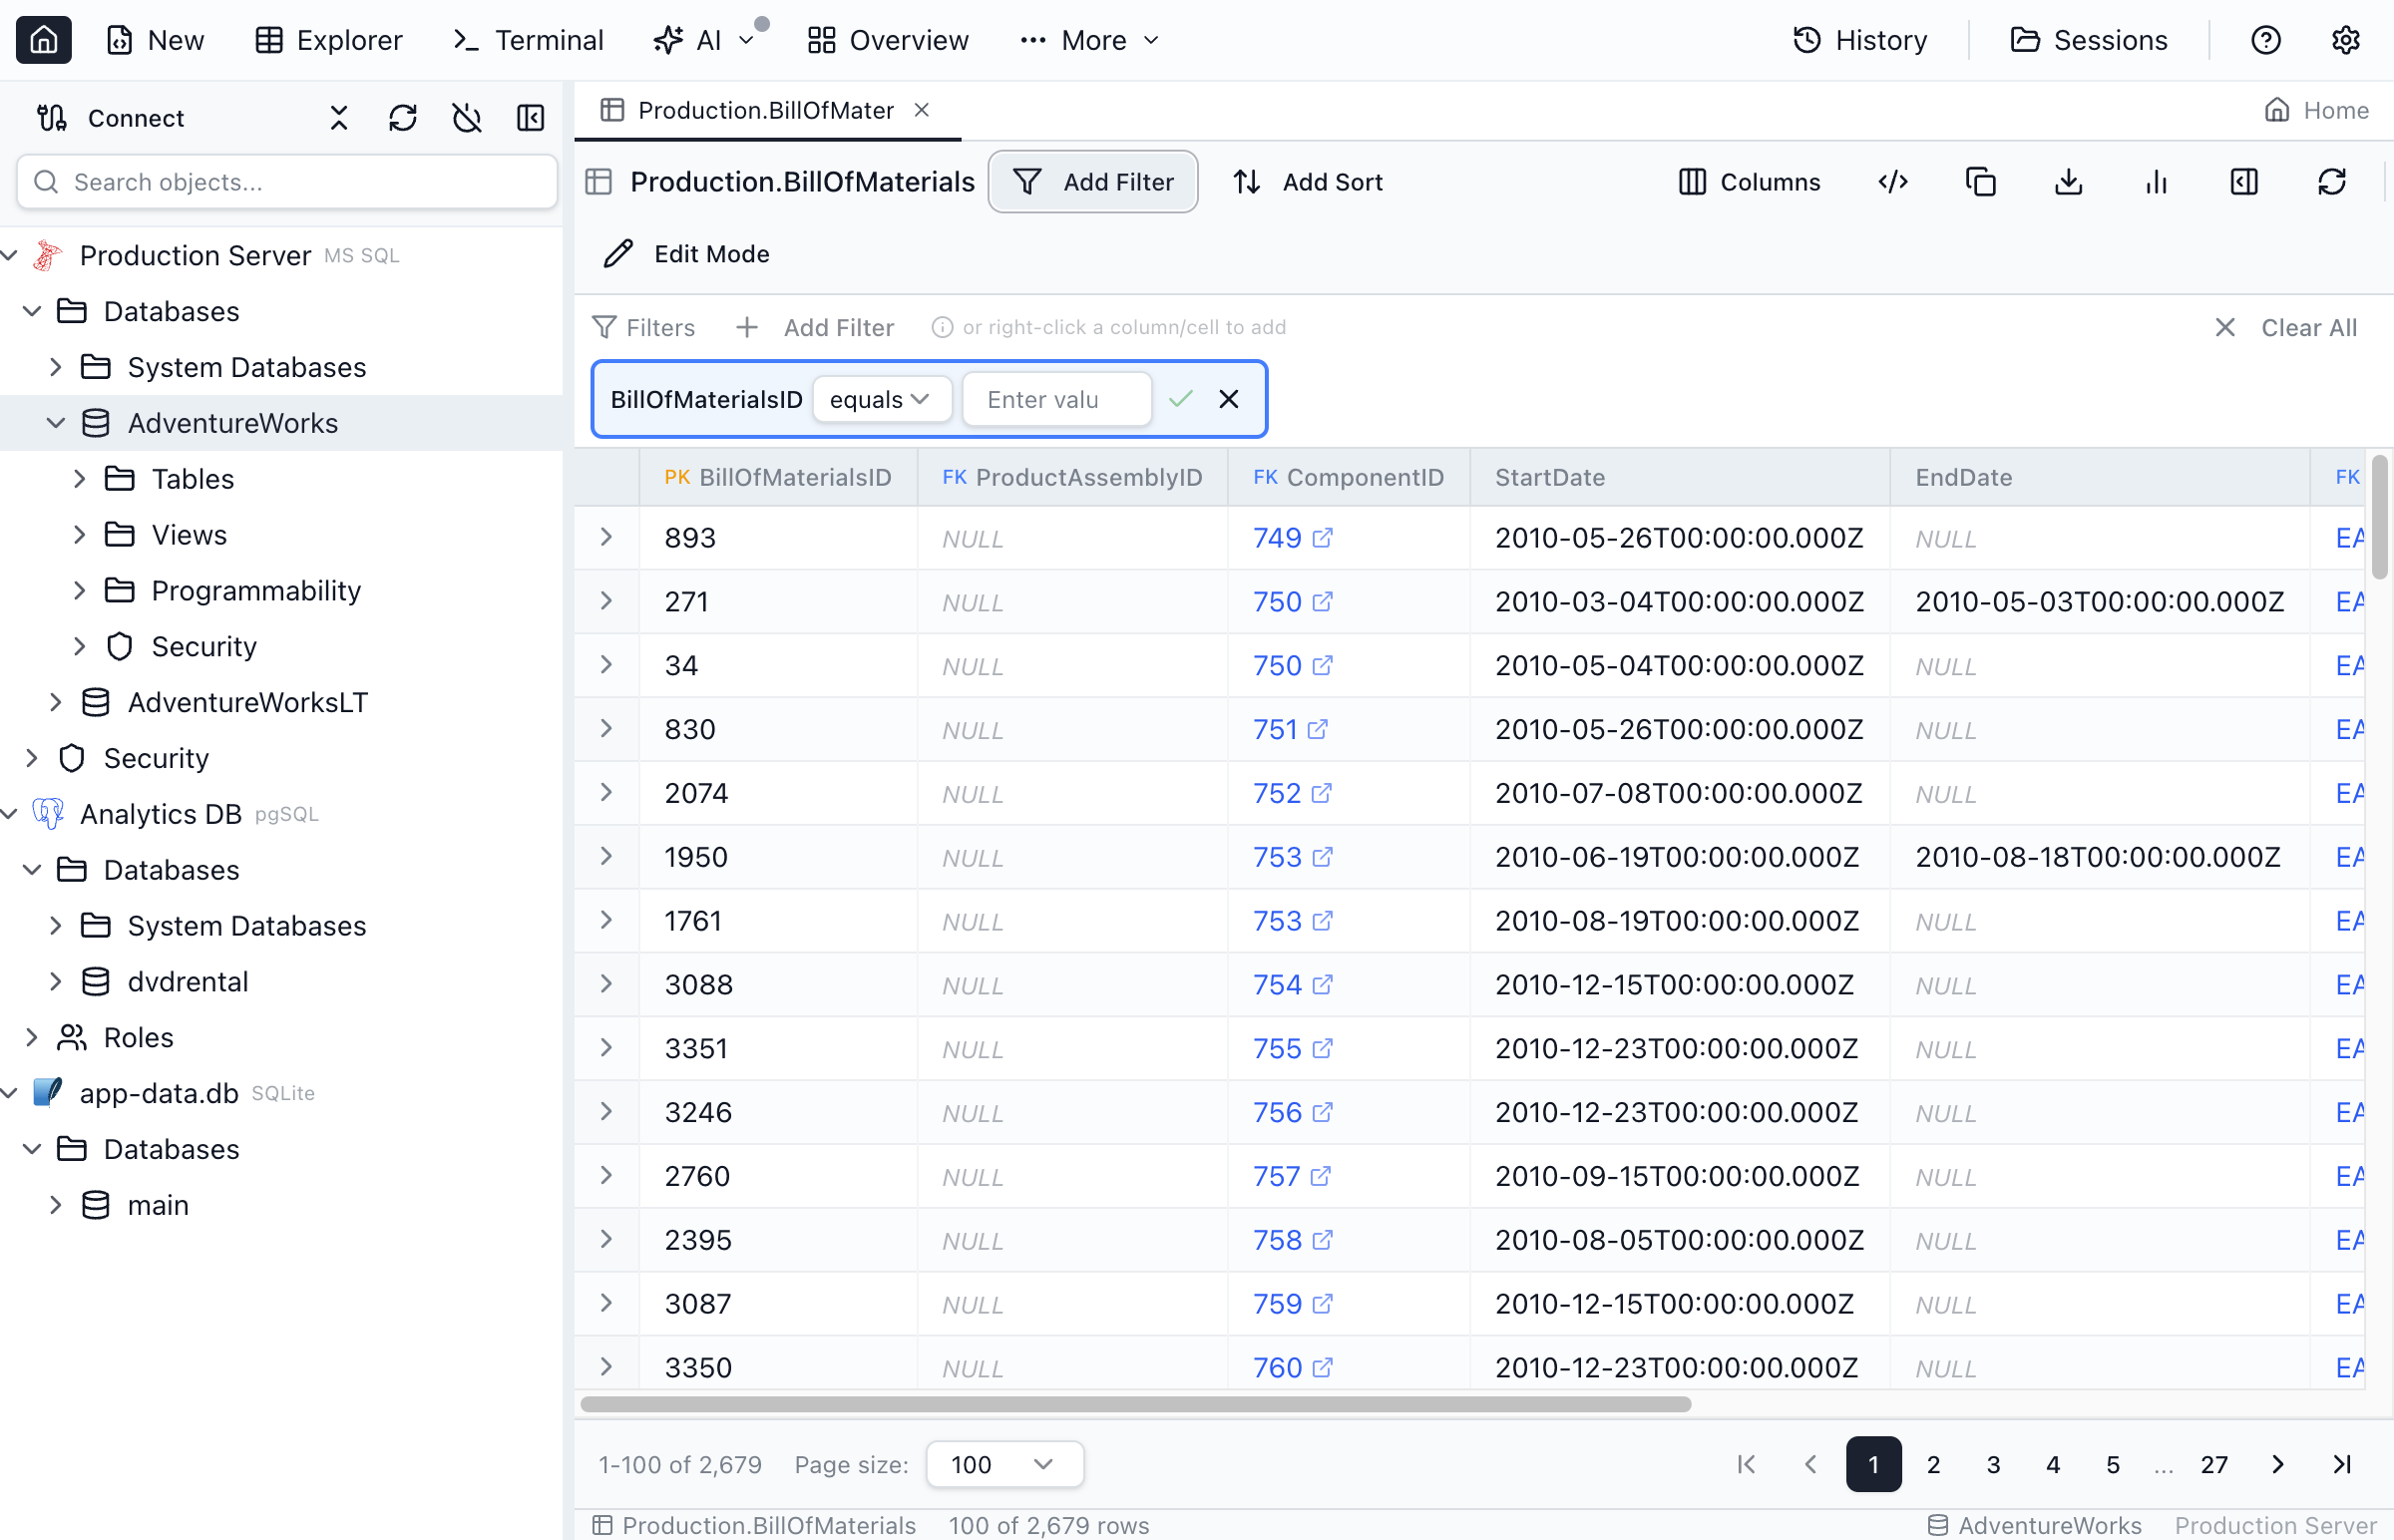
Adding Filters
- Click the Filter button to open the filter panel
- Select a column from the dropdown
- Choose an operator
- Enter the value to filter by
- Click Apply to filter the results
You can also right-click any cell in the data grid and choose Add to filter to start a draft filter row pre-filled with that cell's column, value, and operator (IS NULL for empty cells, = otherwise). The draft is not applied automatically — keyboard focus lands on the value input so you can press Enter to confirm or Escape to cancel. If the column already has a filter, focus moves to the existing one so you can edit it in place.
Filter Operators
Table Explorer supports these filter operators:
| Operator | Description | Example |
|---|---|---|
= | Equals | Status = 'Active' |
!= | Not equals | Status != 'Deleted' |
< | Less than | Price < 100 |
<= | Less than or equal | Age <= 65 |
> | Greater than | Quantity > 0 |
>= | Greater than or equal | Rating >= 4 |
LIKE | Pattern match (% wildcard) | Name LIKE 'John%' |
BETWEEN | Range (inclusive) | Date BETWEEN '2024-01-01' AND '2024-12-31' |
IS NULL | Value is NULL | Email IS NULL |
IS NOT NULL | Value is not NULL | Phone IS NOT NULL |
lookup | Foreign-key row picker (real FKs and declared loose FKs) | customer_id = (pick from Customers table) |
Array Column Operators (PostgreSQL)
For Postgres array columns (integer[], uuid[], text[], …), Table Explorer swaps the regular operator list for a set built around array semantics. Scalar comparison operators like =, BETWEEN, or LIKE would produce nonsense SQL on an array column, so they're hidden — the dropdown only offers operators that actually make sense:
| Operator | Description | SQL emitted |
|---|---|---|
contains | The array contains the given element | 5 = ANY(tag_ids) |
does not contain | The array does not contain the given element | 5 <> ALL(tag_ids) |
is empty | Array has zero elements (distinct from NULL) | cardinality(tag_ids) = 0 |
is not empty | Array has at least one element | cardinality(tag_ids) > 0 |
length = / ≠ / > / < / ≥ / ≤ | Compare the array's element count to a number | cardinality(tag_ids) > 2 |
IS NULL / IS NOT NULL | The column itself is null (different from "is empty") | tag_ids IS NULL |
lookup | Declare a loose foreign key on the array column (each element treated as a target lookup) | — |
FK array columns: when the array column is already a (real or loose) foreign key, contains opens the same row-picker dialog as lookup on a scalar FK column — pick the target row and Table Explorer applies a contains filter on its primary key.
Why cardinality() and not array_length()? Postgres returns NULL from array_length(col, 1) on empty arrays, so = 0 is always false (a footgun). cardinality() always returns an integer — empty arrays are 0, never null.
JSON Column Operators
For native JSON columns (PostgreSQL json/jsonb, MySQL json, SQL Server json, Oracle json) and long-text columns you've declared as JSON, Table Explorer adds a top-level json operator with JSONPath-aware sub-operators (has property, property =, any >, all =, the *_lookup FK sub-operators, and more), engine-correct SQL emission, array-wildcard and recursive-descent support, and an inline shape-peek for path discovery.
The full reference — operator table, per-engine SQL, eligibility, declaring a text column, and the shape-peek — now lives on its own page: JSON Columns.
Filter by Foreign Key (Lookup Picker)
For columns that are foreign keys, the filter row's operator dropdown includes a lookup operator — and it's the default selection. Instead of typing a raw ID, click the picker button on the right side of the filter row to browse the parent (referenced) table.
The picker dialog opens only when you click the picker button (selecting an FK column does not open it automatically) and lets you find a row by either name or ID:
- Search box — matches against both the parent table's display column (guessed from common label-like names:
name,display_name,full_name,title,label,description,code,slug,email,username) and the parent table's primary key. Both lookups are server-side; results are merged and capped at 100 rows. If the parent table has no display-column candidate, the search still works against the primary key alone. - Per-column filter inputs in the grid header — each column gets its own filter cell that's wired into the same database query (not a client-side filter). Use them to narrow by status, country, type, or any other column. Numeric columns expect a number; string columns do
CONTAINS; boolean columns accepttrue/false/0/1. - Drill-down on FK columns. When a column in the picker grid is itself a foreign key, a small chain icon appears next to its filter input. Click it to open another picker for that FK's parent table — find the row you want there, click it, and the picker writes the FK target value back into the column filter, narrowing the original picker. The drill chain is unbounded; a breadcrumb at the top of each nested picker shows the trail (
Orders ▸ customer_id ▸ Customers ▸ region_id ▸ Regions) so you always know which value you're picking and for which column. - Column ordering in the grid puts the FK target first (the column whose value is returned), the display column second, and the primary key third when it's a different column from the FK target — so the value, the label, and the id are always visible without horizontal scrolling.
- Click a row to write its FK target value back into the filter and apply it. The filter chip then displays the picked value alongside the parent row's display column when available — for example
42 — Acme Corp.
You can switch the operator back to =, IN, IS NULL, or any other operator on the same row if you want to type a raw ID instead — lookup is the convenient default for FK columns, not a lock-in. The lookup operator is now also listed at the bottom of the operator dropdown on every regular column. On a non-FK column it triggers the loose foreign key declaration flow described below — pick a target table/column once, and the picker behaves like a real FK from then on.
Loose Foreign Keys (declared relationships)
Loose foreign keys are user-declared column→column references that aren't enforced by a database FK constraint. They're stored in a per-database MetaInfo file alongside Jam SQL Studio's other user-owned metadata, so a relationship you declare on one table is shared across Table Explorer, Query Editor, Schema Overview, Dependency Viewer, and Data Profiling for that connection + database.
Use them when:
- The schema doesn't have FK constraints (legacy databases, denormalised reporting tables, ETL staging schemas)
- The reference is logical only (cross-database, cross-schema, polymorphic
entity_id) - You want FK navigation, the lookup picker, and the inbound “Related data” tab to work without altering the schema
Declaring a loose FK
- Open the filter panel and add a row for any non-FK column
- Open the operator dropdown and pick
lookup(it's at the bottom) - The target picker dialog opens with a guess pre-filled — Jam SQL Studio strips common suffixes (
_id,_uuid,Id) and matches against schema/table/column names, including plural variants and prefix/suffix overlaps - Confirm the suggestion or pick a different schema, table, and column
- Save — the relationship is persisted, and the filter row immediately switches to the same FK lookup picker used by real foreign keys
Once saved, the column behaves like a real FK throughout the app:
- The filter row's picker button opens the parent table picker, with the same search, per-column filters, and unbounded drill-down
- Result-grid cells render the value as a clickable link (see below)
- The Row Details “Related data” tab lists rows from tables that loosely reference this row, marked with a “Loose” badge
- Schema Overview and Dependency Viewer show the relationship as a dashed blue connection
Visual cue: loose FK vs real FK
Loose FKs are styled distinctly so you always know which references are enforced by the database:
- Real FKs — solid blue link with the external-link icon
- Loose FKs — teal link with a dashed underline and the chain (Link2) icon
- The cell popover that opens on click shows the referenced row, plus a Clear loose relation button at the bottom that removes the declaration
- Schema Overview edges for loose relationships are dashed blue and labelled “Loose relationship”; Dependency Viewer marks connected nodes with a “Loose” badge
Editing or removing a loose FK
You can manage a single relationship from the filter row that uses it: an edit pencil reopens the target picker so you can repoint to a different table or column, and an X removes the declaration. To see and manage every loose relationship for the current database in one place, open the MetaInfo manager dialog from the Link2 icon in the Table Explorer toolbar. The dialog lists every declaration, lets you remove individual entries, and offers Export (write all MetaInfo to a JSON file) and Import (merge or replace from a JSON file) so you can sync declarations across machines or share them with teammates.
Storage
MetaInfo is stored at {user data}/metainfo/<connection>/<database>.json (versioned, atomic writes). Each (connection, database) pair has its own file, and the same file is read by Table Explorer, Query Editor, Schema Overview, Dependency Viewer, and Data Profiling — declare a loose FK once and every surface picks it up.
Multiple Filters
Add multiple filter conditions to narrow down results. All filters are combined with AND logic, meaning rows must match all conditions to appear.
Clear Filters
Click the Clear button to remove all filters and show all data. You can also remove individual filters by clicking the X next to each condition.
Editing Data
Table Explorer provides inline editing for quick data modifications:
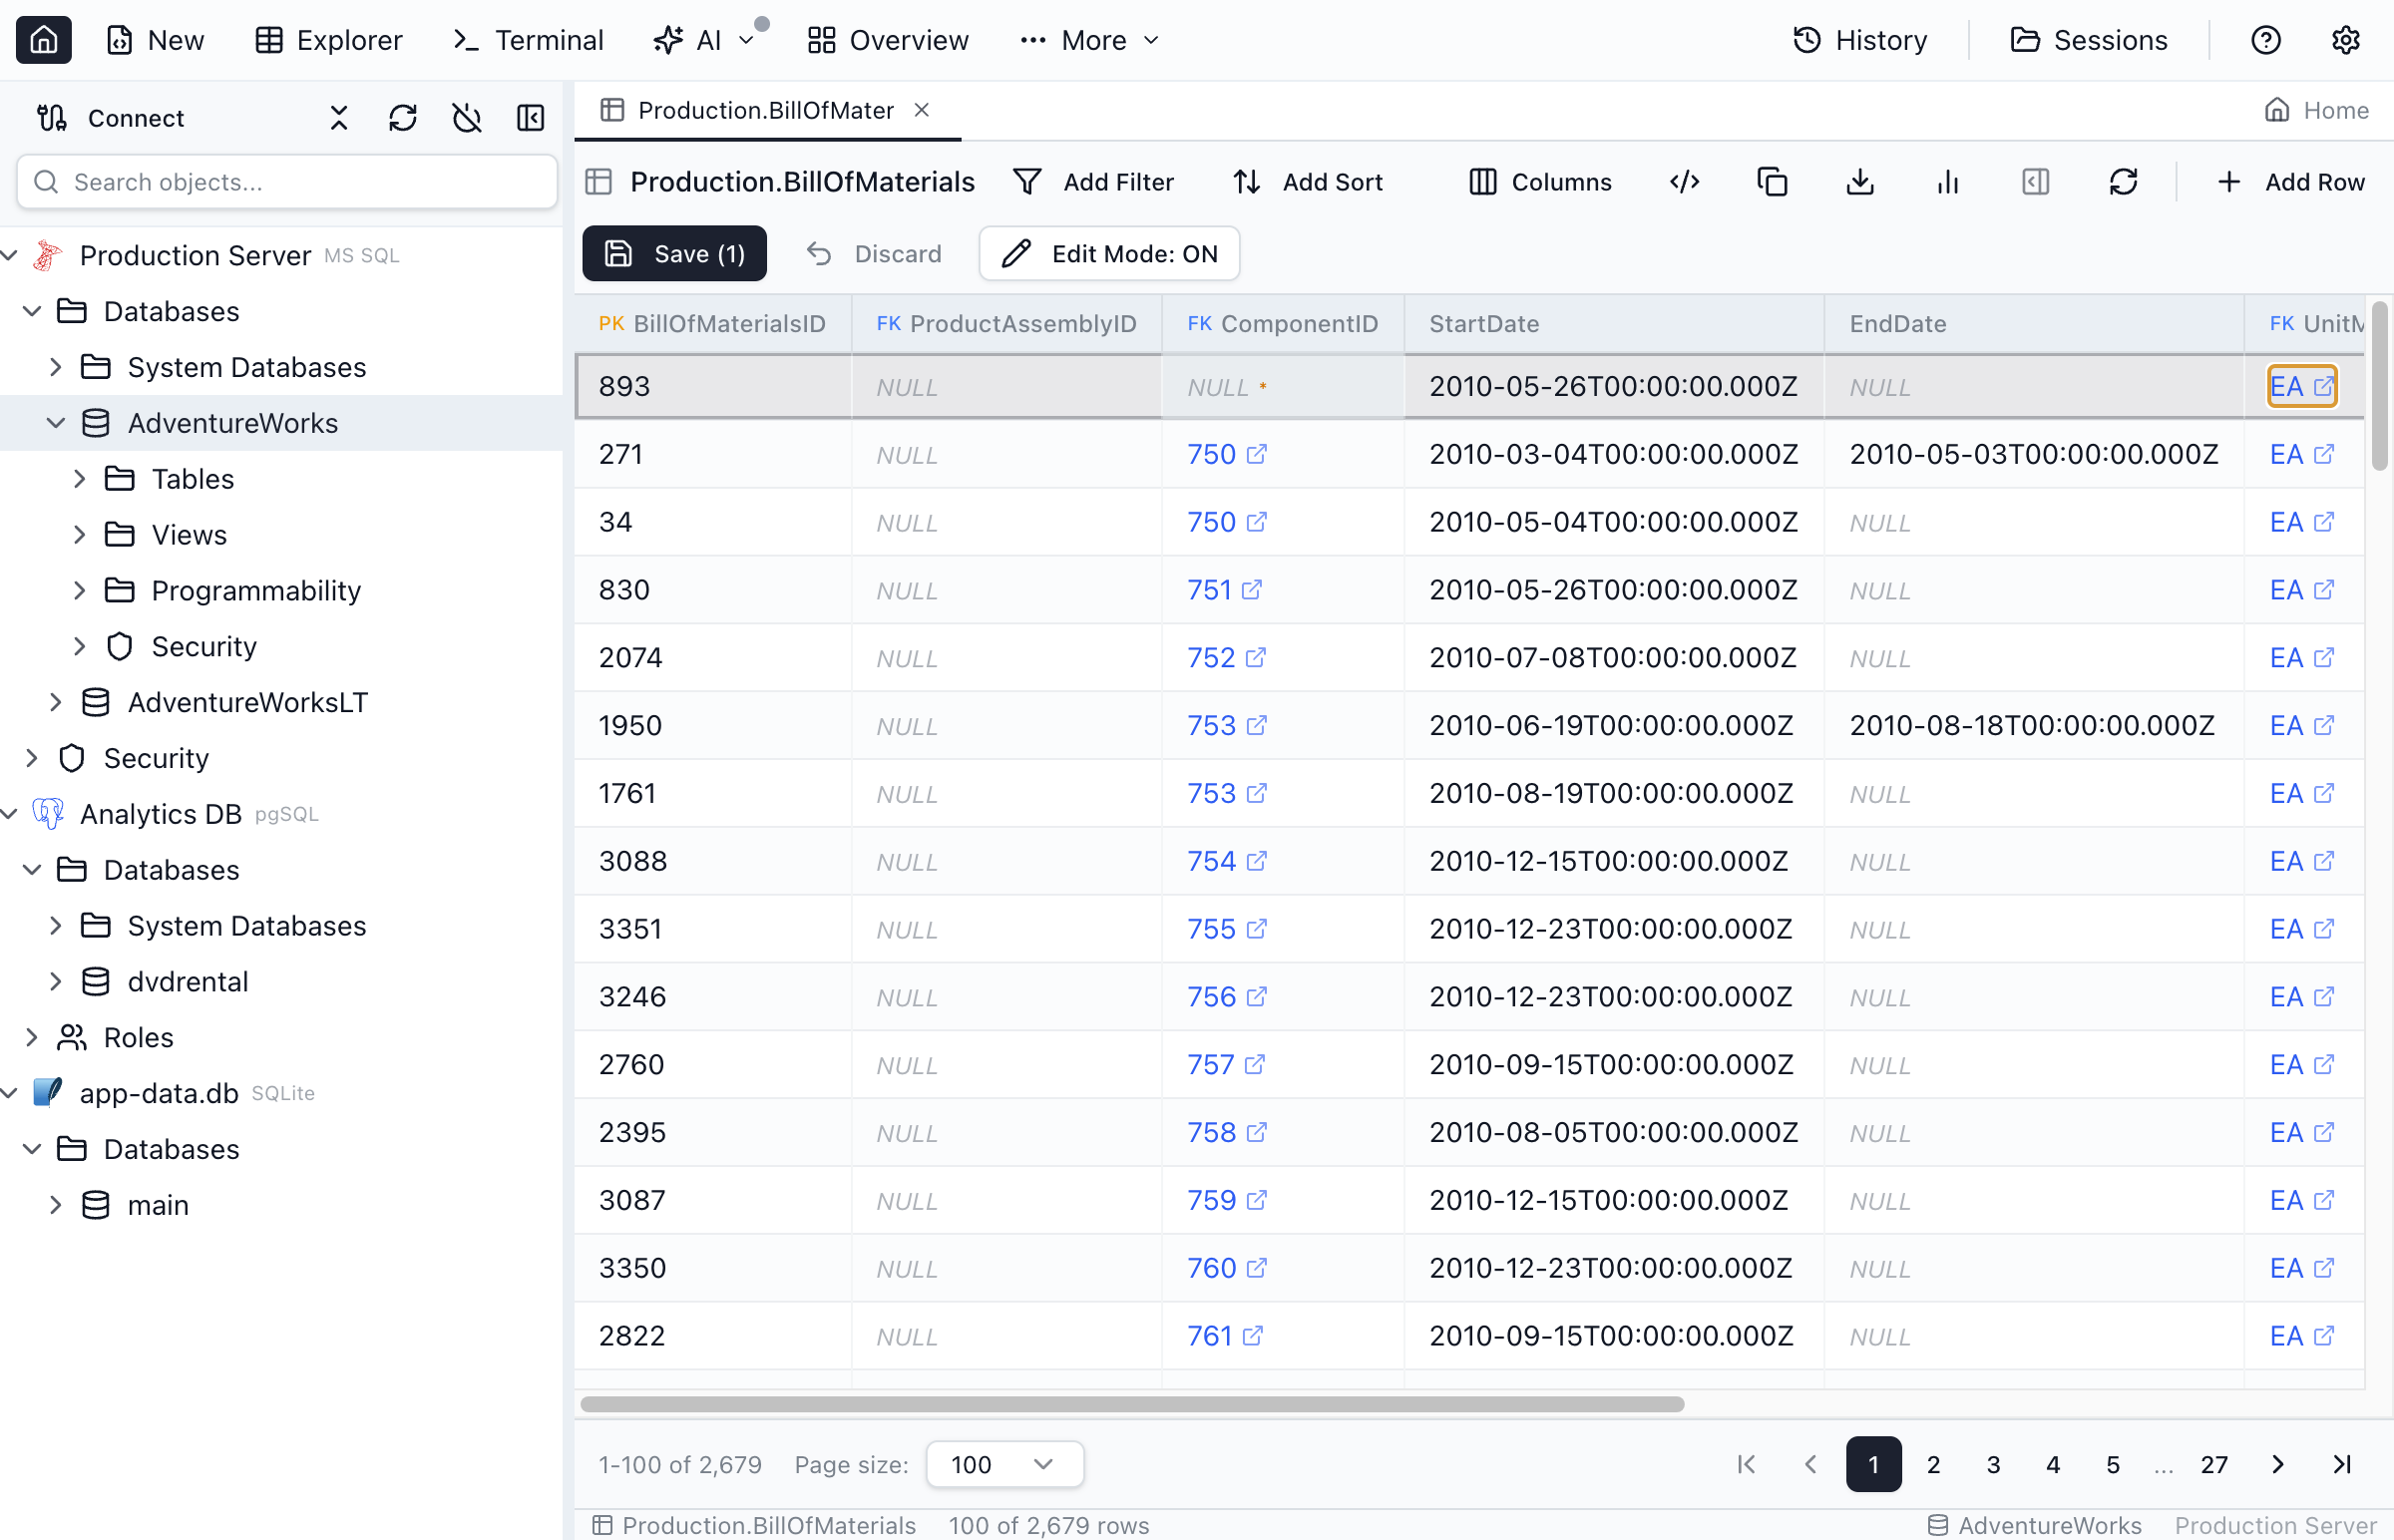
Enable Edit Mode
Editing is disabled by default to prevent accidental changes. To enable editing:
- Click the Edit toggle button in the toolbar, or
- Use Edit Top 200 from the Object Explorer context menu
Inline Cell Editing
- Click any cell to select it
- Start typing to replace the value, or press
F2to edit - Press
Enterto confirm orEscapeto cancel - Modified cells are highlighted until saved
Smart inputs for enum, foreign-key, and boolean columns
- Enum columns (declared or native) show a values peek below the input. Type to live-filter, click a value to commit, or press
Enterto commit free text — the peek is a hint, not a constraint. The settings/gear button opens the Enum values details dialog. - Foreign-key columns (real and loose) show a Search row in … link that opens the row picker — the same one used by the
lookupfilter operator. Polymorphic loose FKs list one entry per matching declaration. Free text +Enterstill works as a fallback. - Boolean columns (
bit,boolean,tinyint(1)) render an inline segmented toggle withTRUE/FALSEoptions. Nullable columns get a thirdNULLoption. Clicking an option commits immediately;Escapecancels. Free-text typing is intentionally not offered — booleans are a closed set.
The same smart inputs apply consistently across every editing surface: the main data grid (this section), the inline Row details panel (Pencil affordance per cell), the Single-Row Details View (Pencil top-right of each cell on hover), and the Query Editor results grid. FK declarations and enum sets are resolved against the column's source table, so a query result that selects from a JOINed table still surfaces the right picker.
Expanded Editor (JSON & Multiline Text)
For JSON and multiline text, click the expand (maximize) icon in a cell to open a larger editor.
- Large text columns (for example
nvarchar(max),text,json/jsonb) show the expand icon by default - Short text columns (for example
nvarchar(200)) show the expand icon only when the value contains newlines (columns sizednvarchar(256)or larger show it by default) - JSON/Text mode tabs - Switch between JSON and Text modes in the dialog (the initial mode is chosen automatically)
- Tree / Code sub-views for JSON - the Tree view renders the document as a collapsible structure with keyboard navigation (Arrow keys, Home/End); the Code view drops into a Monaco editor for free-form JSON edits. Your last preference is remembered across dialog opens.
- Copy - Use the Copy icon in the dialog header to copy the full value to your clipboard
Editing JSON in the Tree view
Once you click Edit, the Tree view becomes interactive — you can change values, add or remove object keys, and append or splice array elements without dropping into Monaco:
- Click a primitive to edit it in place. Strings and numbers open a small input; booleans expose a true/false select. Press
Enterto commit,Escapeto cancel. - + key on an object container opens an inline name input — press
Enterto add the key (with an empty-string value) orEscapeto abort. - + element on an array container appends a new empty-string element you can edit immediately.
- The X button next to each non-root entry removes that key (object) or splices that index (array). Subsequent indices shift, matching JS array semantics.
- Switching to Code at any point shows the same JSON as plain text — the two views stay in sync. The dialog's normal validation, save, and pending-row pipeline handle the result either way.
Adding New Rows
- Click the Add Row button in the toolbar
- A new blank row appears at the bottom of the grid
- Fill in the column values
- Click Save to insert the row into the database
Deleting Rows
- Select the row(s) you want to delete
- Click the Delete button or press
Delete - Rows are marked for deletion (shown with strikethrough)
- Click Save to permanently delete from the database
Saving Changes
Changes are not written to the database until you explicitly save:
- Save - Click the Save button to commit all pending changes
- Pending indicator - Shows the count of modified/added/deleted rows
- Review changes - Hover over the pending indicator to see a summary
Discarding Changes
To undo uncommitted changes:
- Click Discard to revert all pending changes
- Right-click a modified row and select Revert to undo that row only
Foreign Key Navigation
Table Explorer keeps your whole drill-down path inside a single tab. When you click a foreign-key value, click into a related-data row, or open a record's full details, Jam SQL Studio pushes a node onto the tab's navigation tree instead of opening yet another tab. The path you took stays visible as a breadcrumb chip-row above the grid, and every chip is clickable so you can jump back to any prior step. Both real (declared) foreign keys and loose foreign keys work as navigation hops.
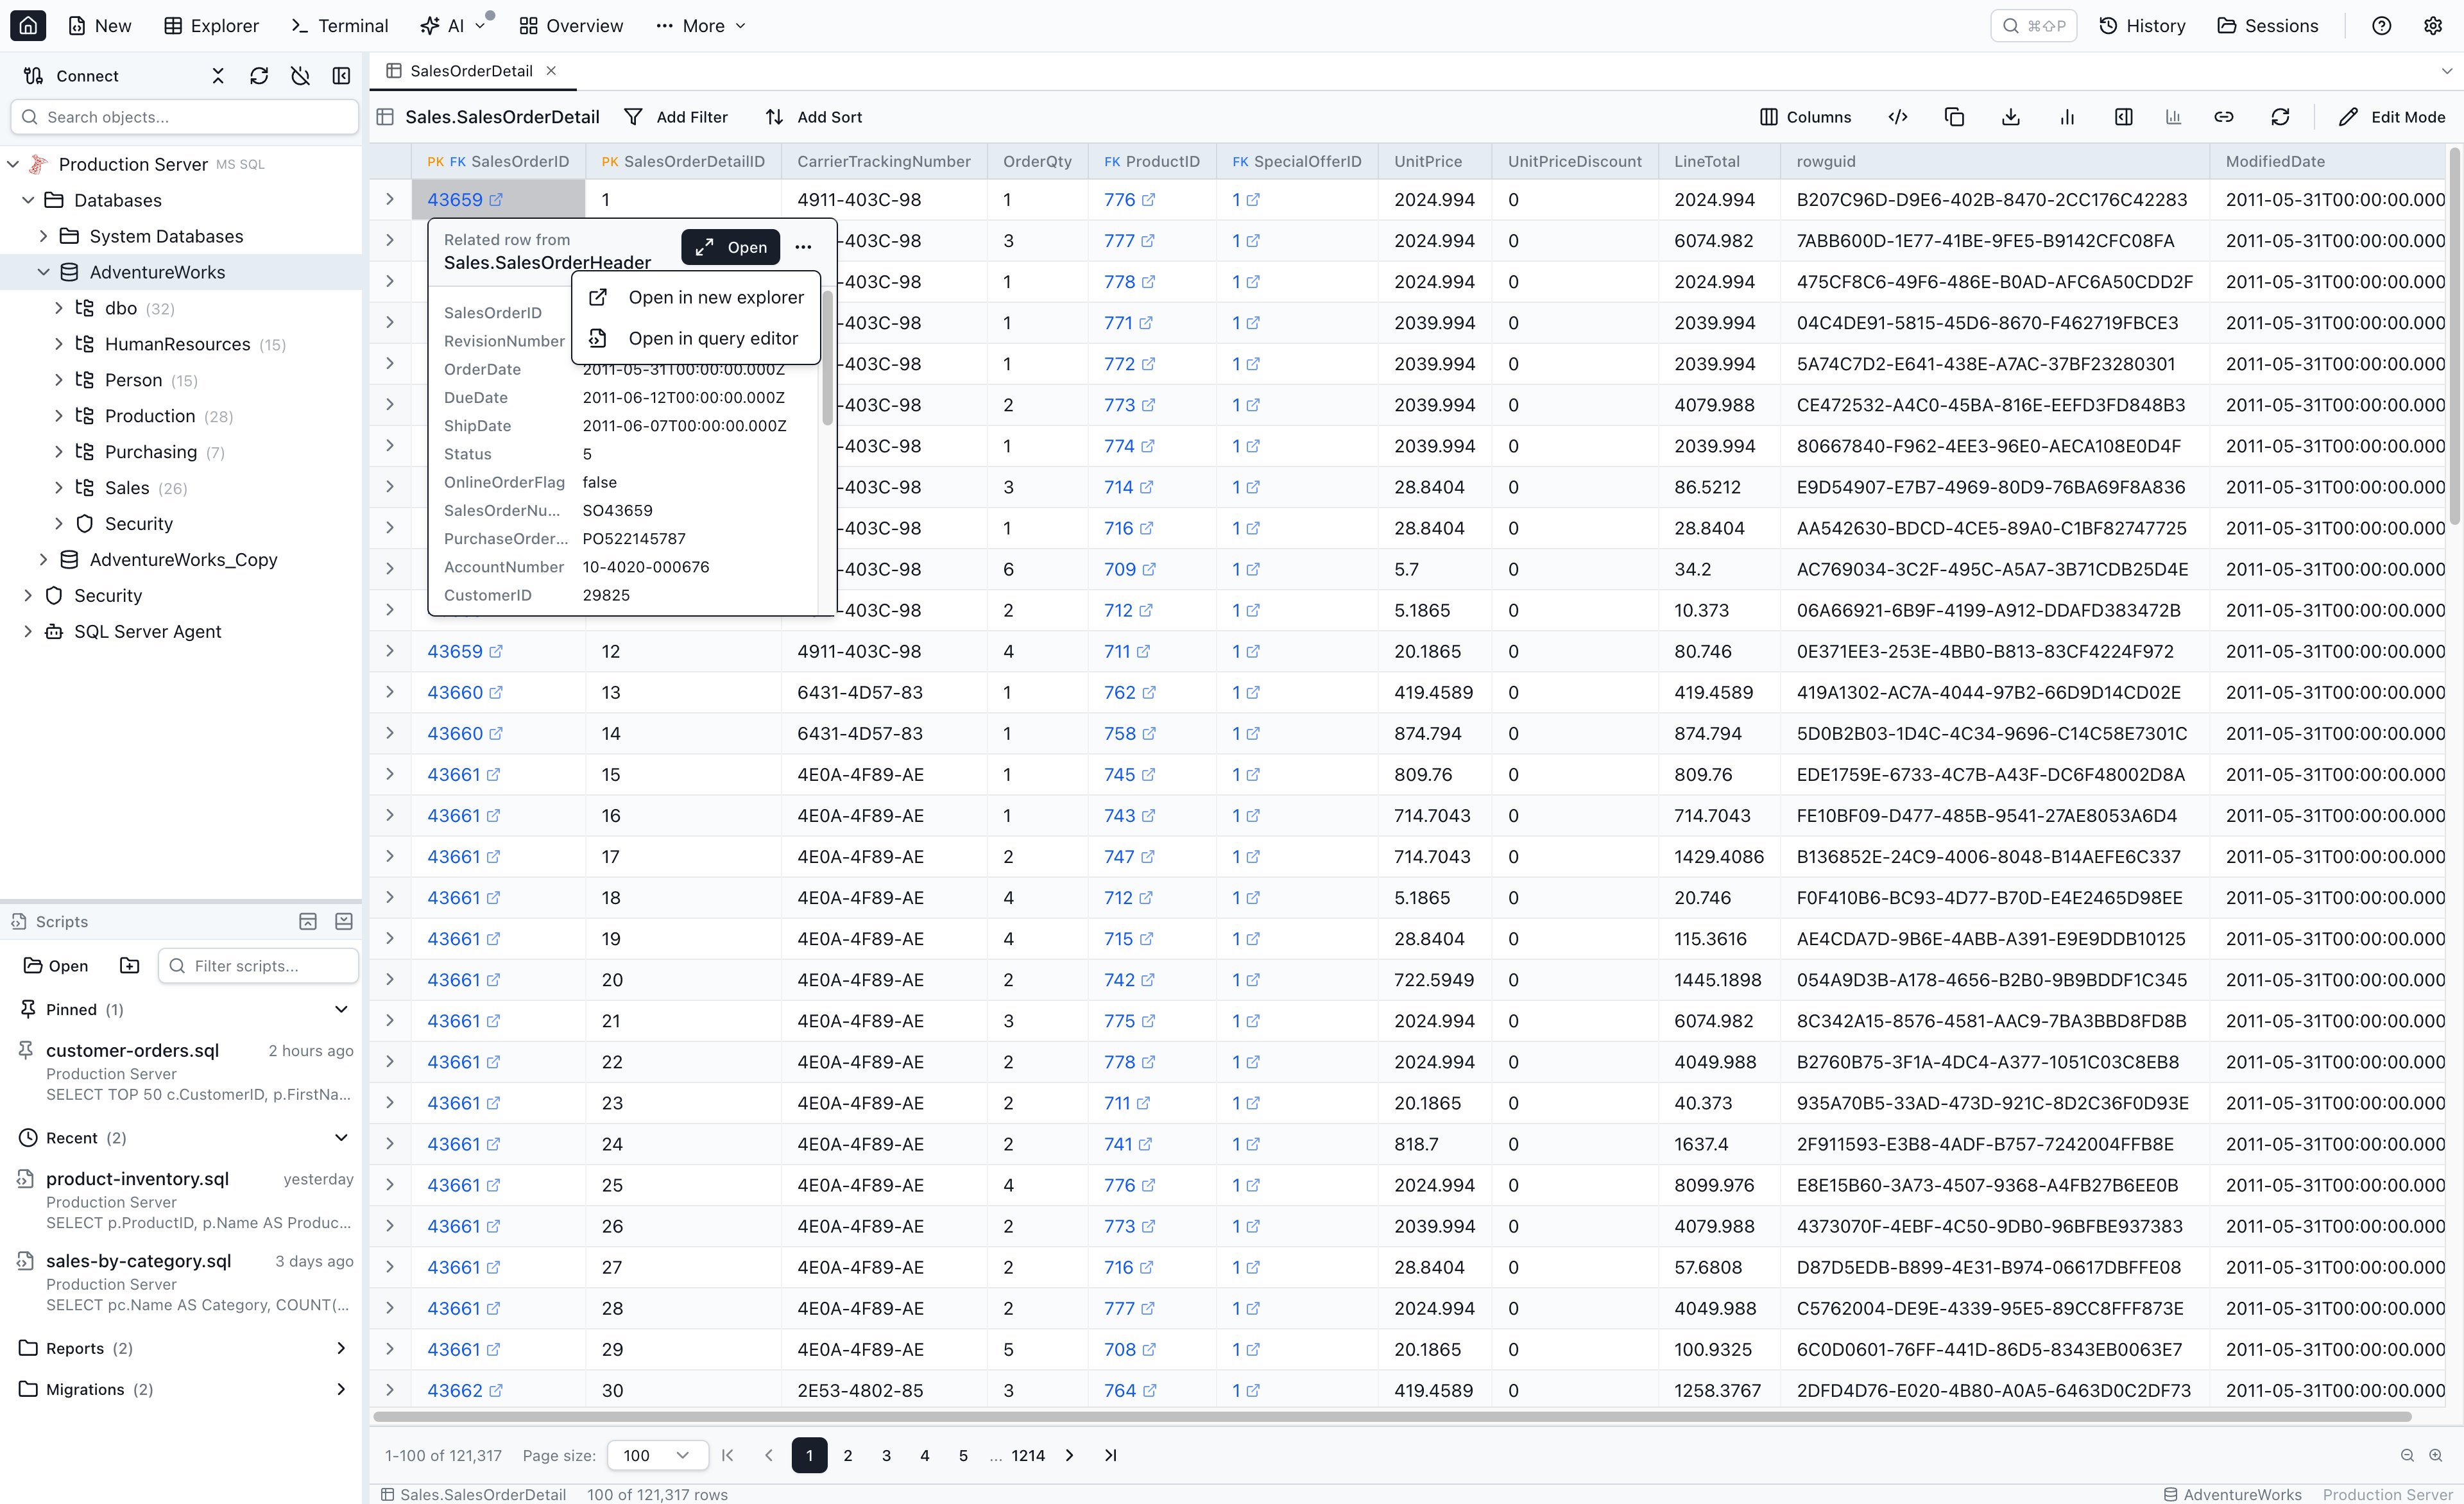
FK peek popover — Open + the … menu
Clicking a foreign-key cell still opens the familiar peek popover with a preview of the referenced row. The primary action button is labelled Open (with a Maximize2 icon). Clicking it pushes the referenced row onto the current tab's navigation tree and activates the Single-Row Details View.
Next to Open is a … (three-dot) menu with two secondary actions:
- Open in new explorer — opens a new Table Explorer tab with the referenced row as its root (no breadcrumb). This is the same behaviour the old Open in Table Explorer button used to perform.
- Open in query editor — opens a new Query Editor tab pre-filled with
SELECT * FROM <target> WHERE <pk> = <value>so you can tweak the query before running it.
Modifier shortcut: Cmd-click (macOS) or Ctrl-click (Windows / Linux) on an FK cell bypasses the popover and immediately opens the target in a new explorer tab — useful when you want the old new-tab behaviour without going through the … menu.
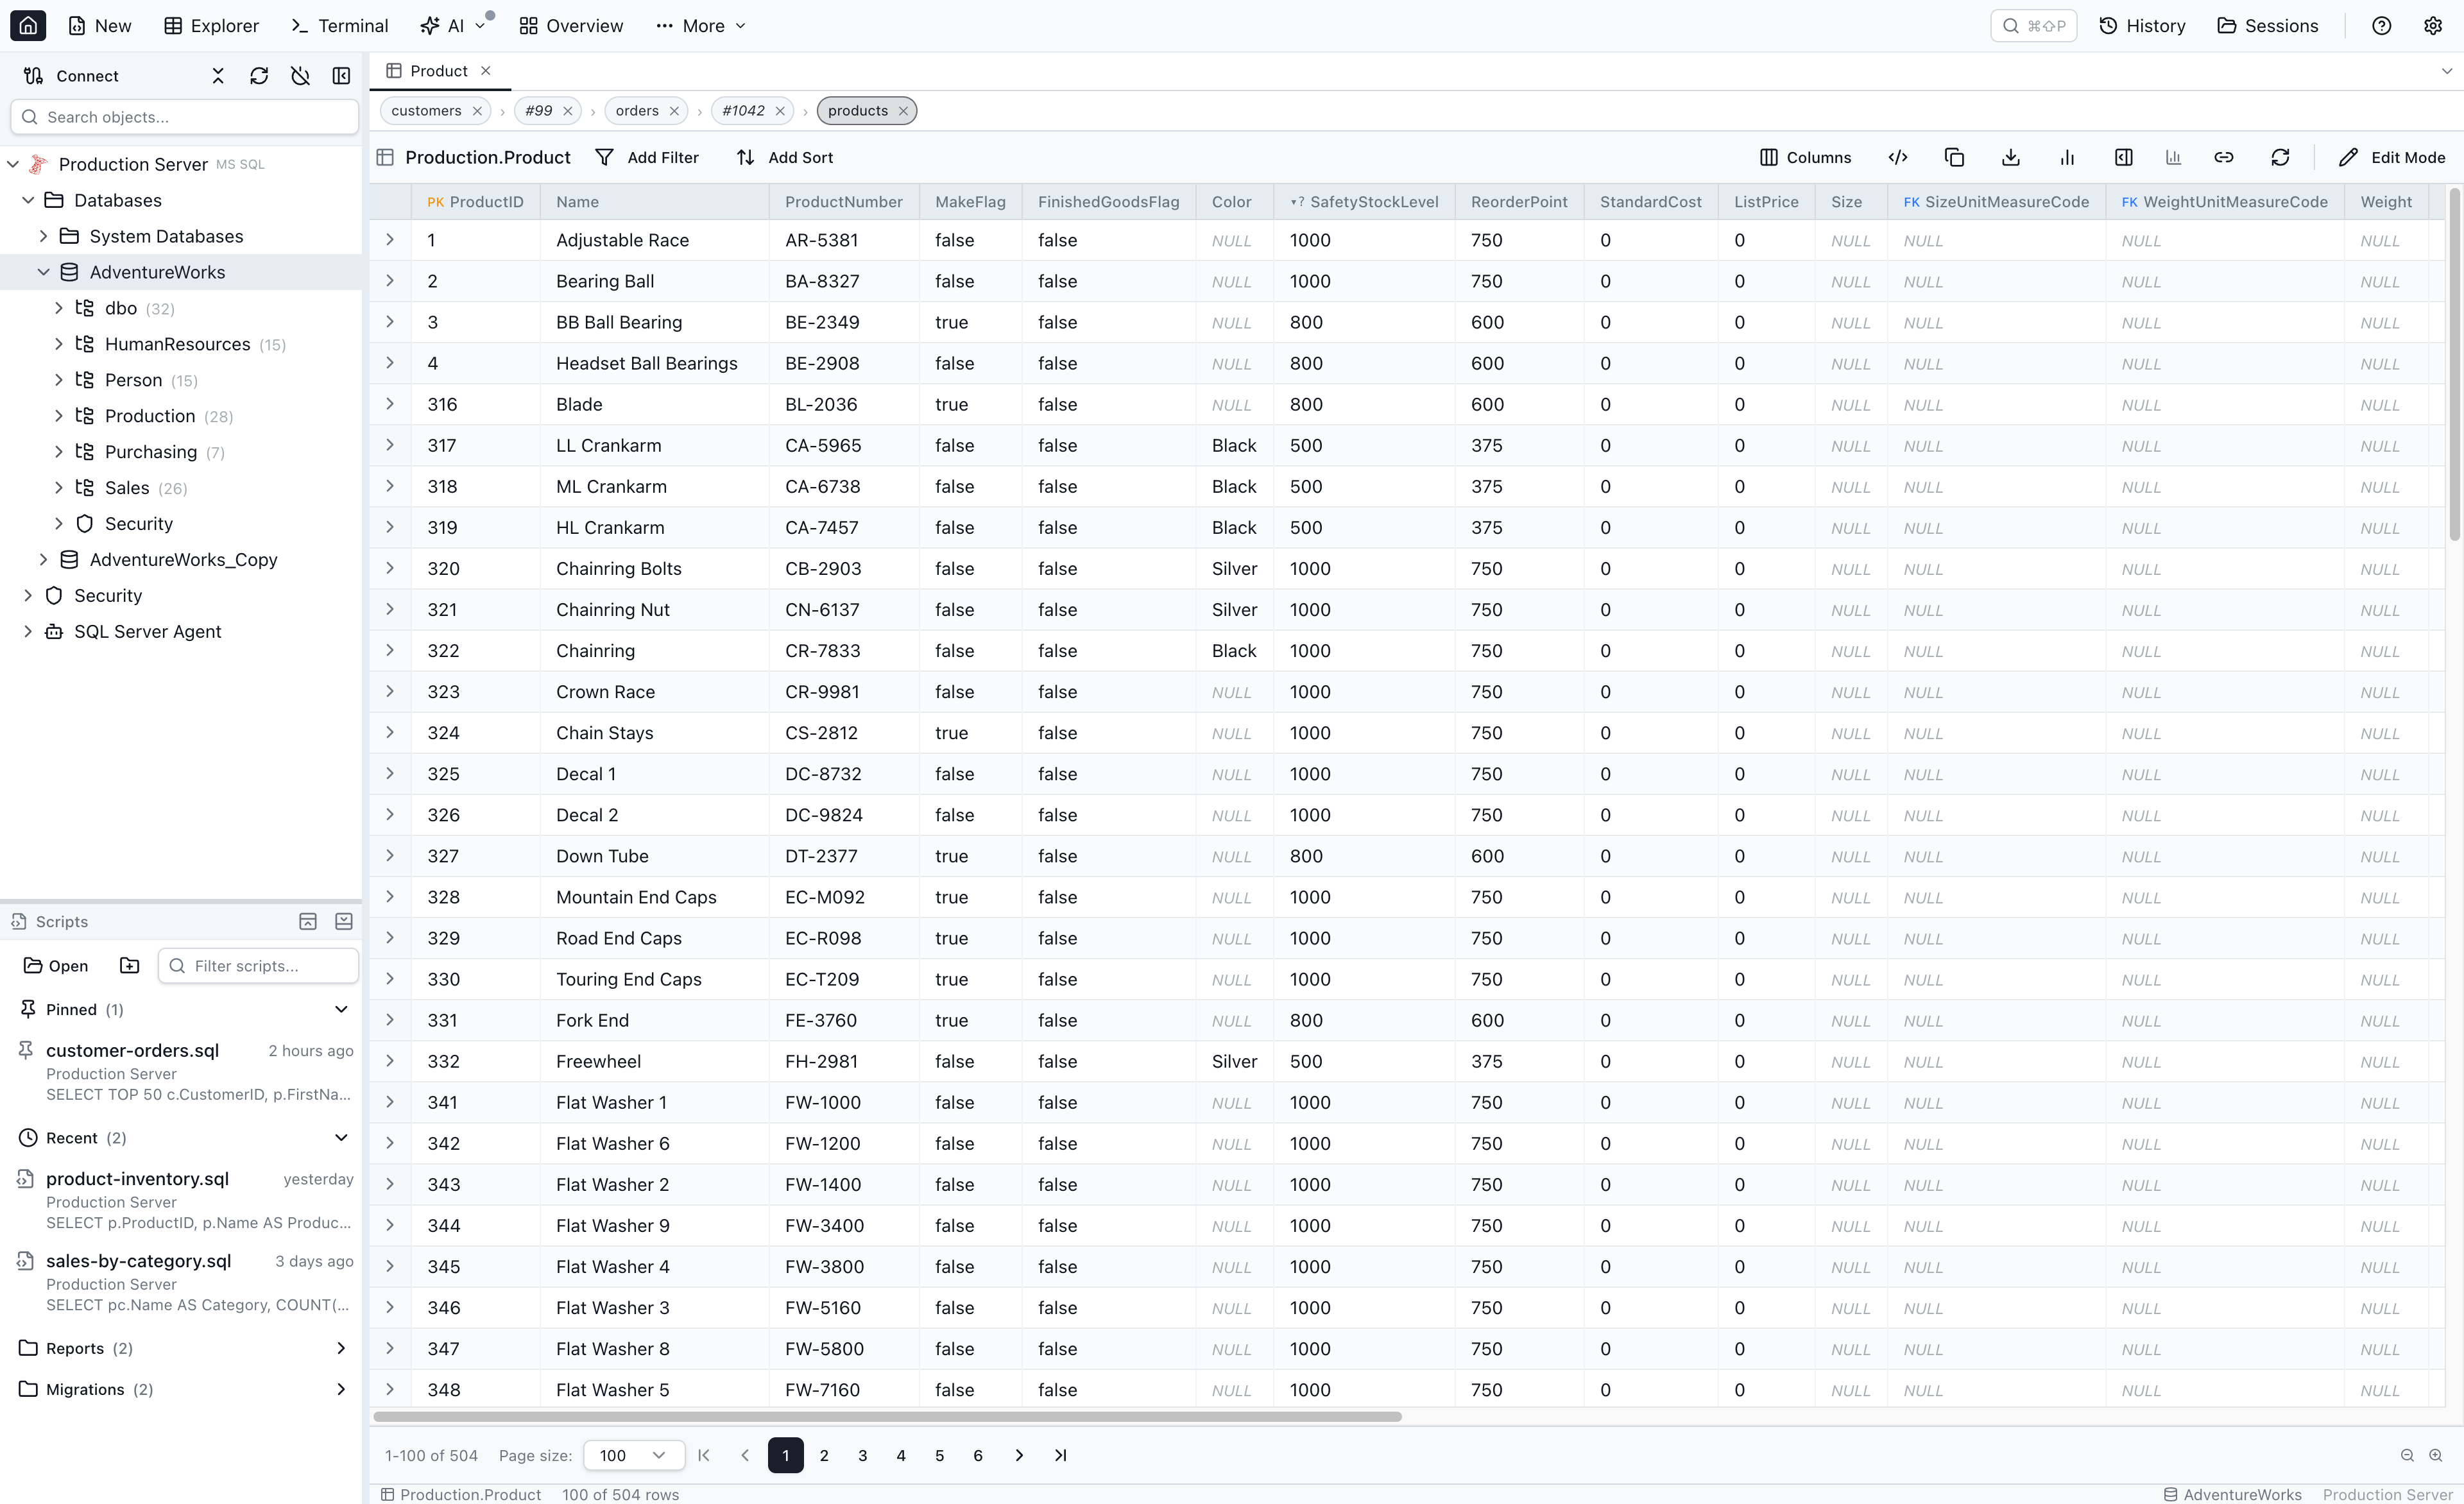
Breadcrumb chip-row
The chip-row appears at the top of the workspace as soon as the tab's navigation tree has more than one node. Each chip is a hop in the path:
- Click a chip to activate that node — the workspace switches view (table-node → grid; row-node → Single-Row View). The tree is not mutated; sibling branches remain.
- Click the × on a chip to drop that node and its subtree from the tree. If the dismissed node was the active one, its parent activates.
- Branching renders as a multi-row tree — when a chip has more than one child, the active path stays on row 0 and each sibling branch lives on its own row below, anchored to the parent chip by a drawn L-arrow. Click any chip on any row to activate it in place; rows do not reshuffle.

Single-Row Details View
The Single-Row Details View activates whenever a row-node becomes active in the tree. It replaces the grid for that tab while the chip-row above and the tab title still show the path.
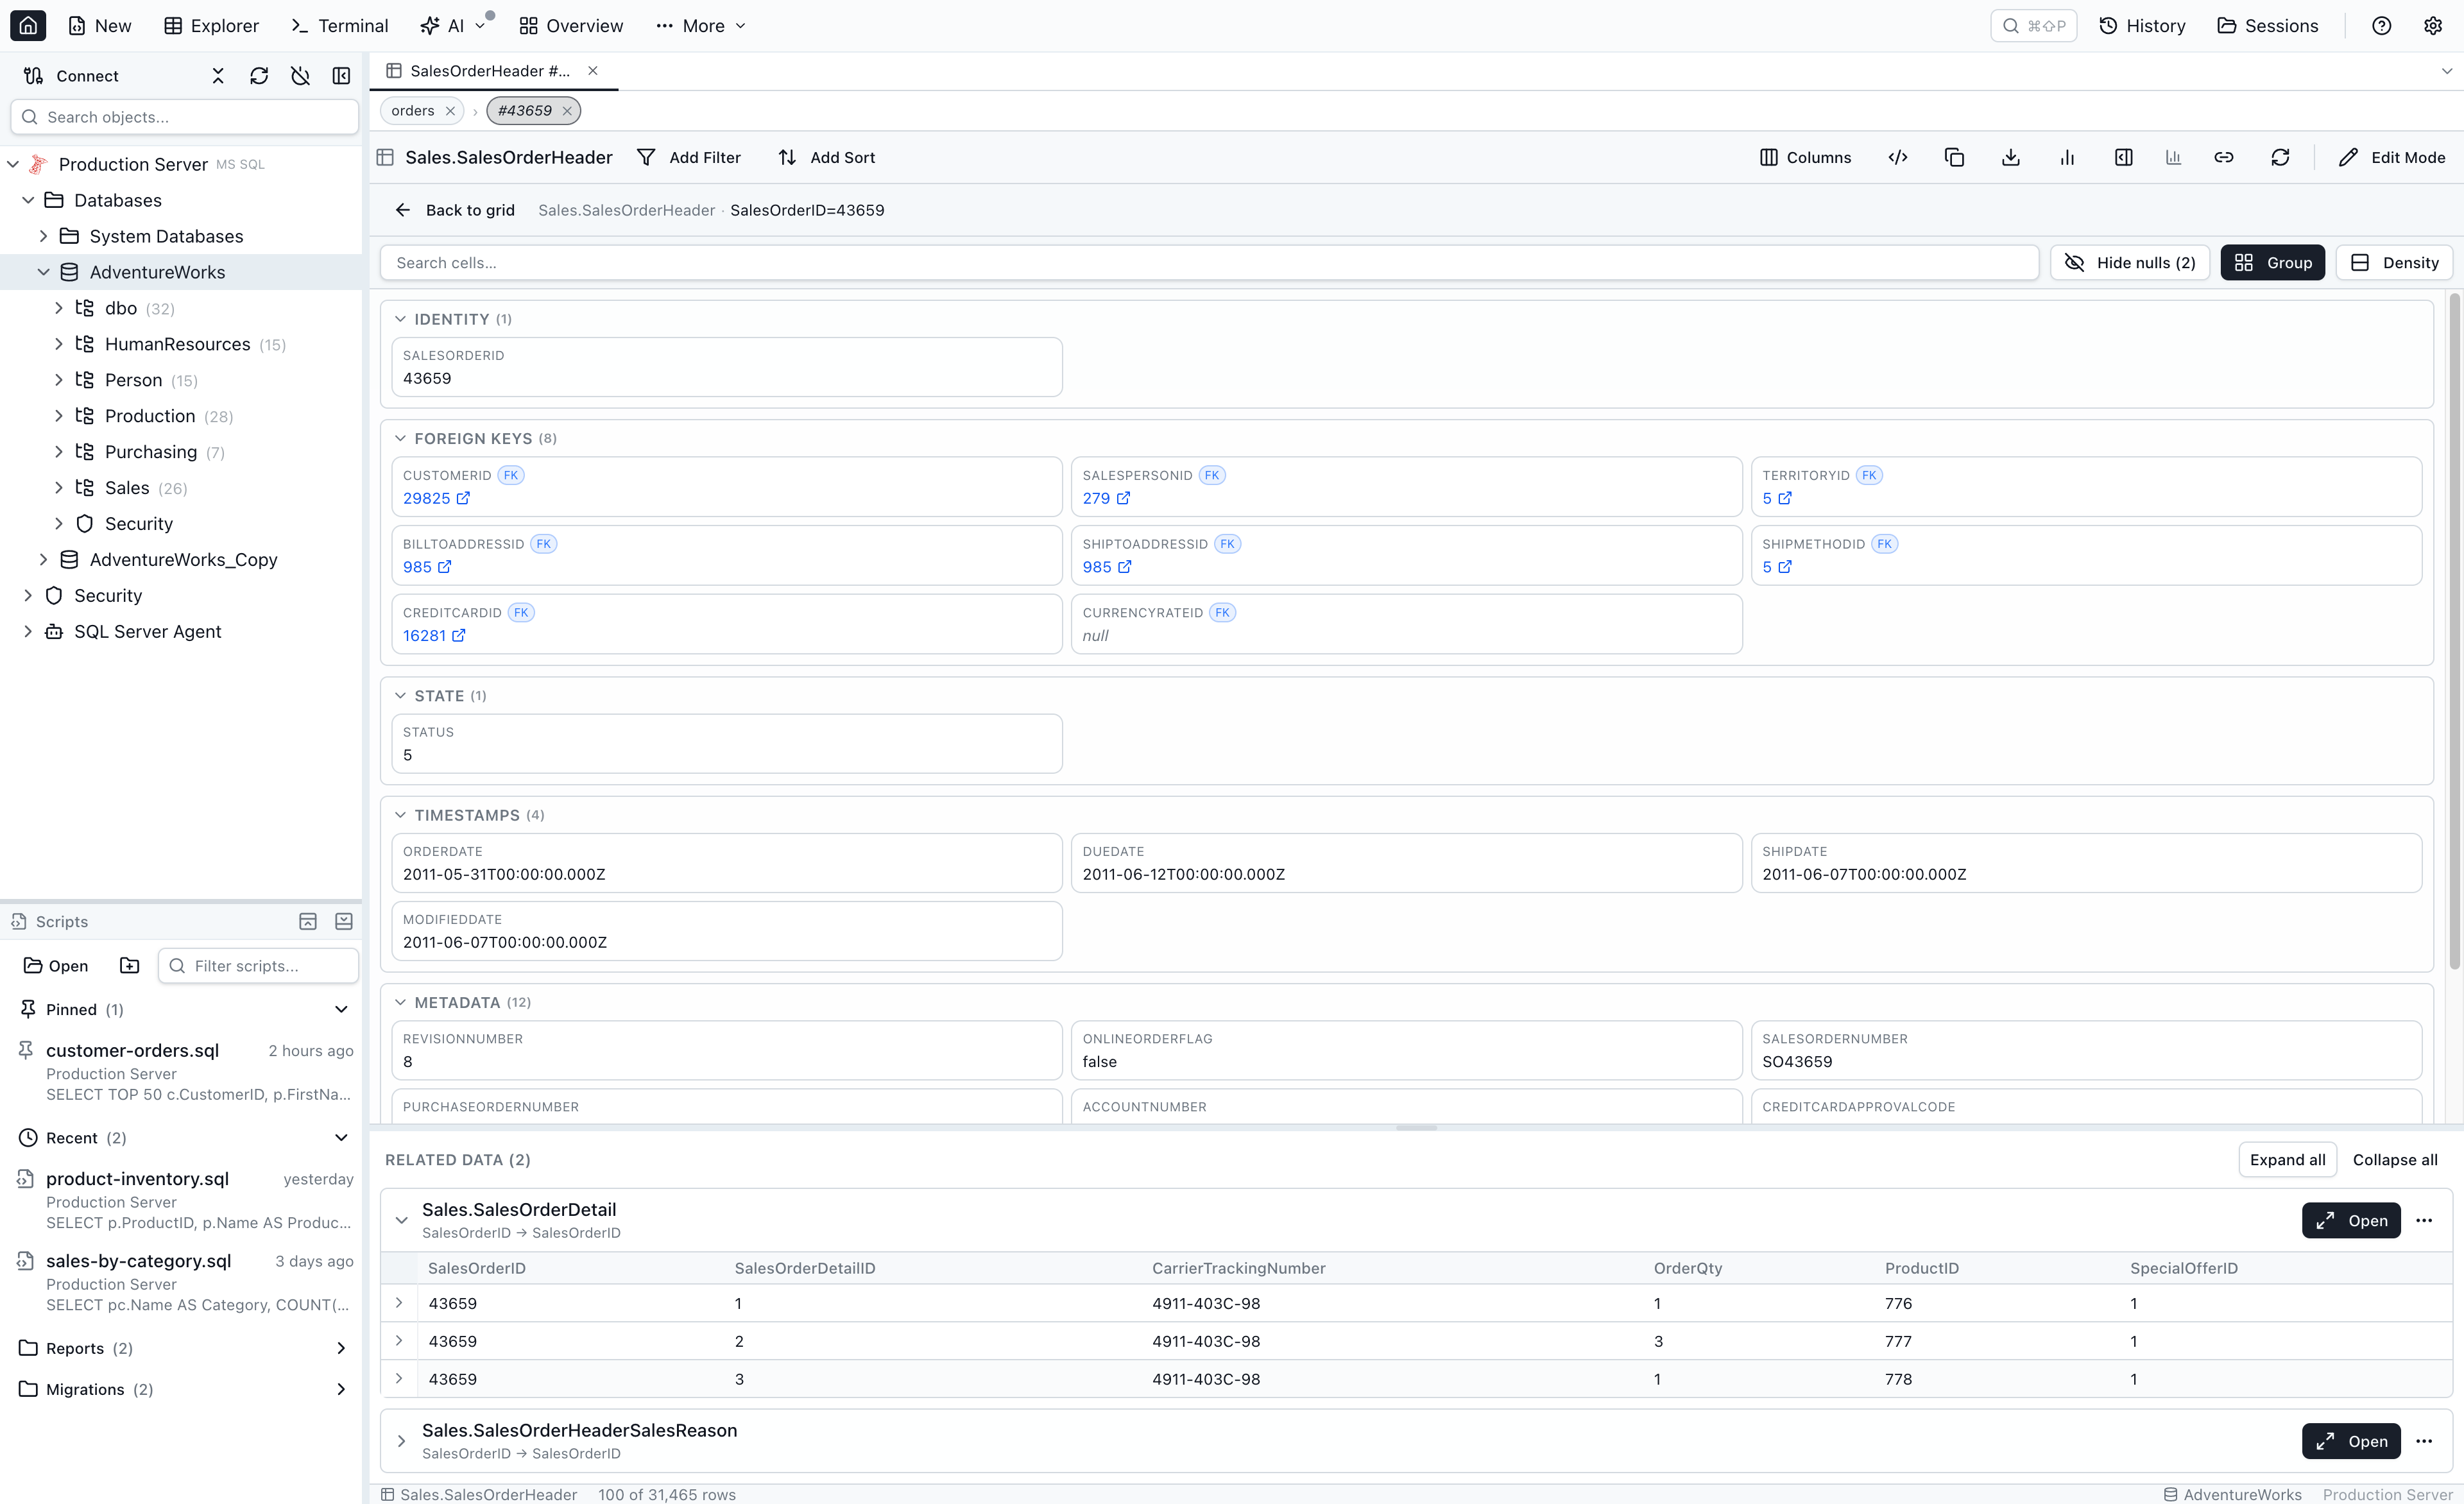
The top panel renders the row's cells, grouped into a fixed order:
- Identity — primary-key and unique non-FK columns (slug, uuid, legacy_id, code).
- Profile — display fields (name, email, phone, avatar, bio).
- Foreign keys — every column that has a declared FK or a loose-FK target.
- State — enum columns, boolean flags, status-like names.
- Timestamps —
*_at,*_date,*_timecolumns. - Counters & metrics — numeric columns whose name matches
count|total|sum|avg|max|min|score|rate. - Metadata — JSON / JSONB / long-text columns and everything else.
The row-details panel is bounded (at most 45% of the workspace) so that even wide rows with 60+ columns still leave room for Related Data below. A small toolbar in the panel offers:
- Cell-name search — fuzzy-filter cells across all groups.
- Hide nulls — default on for wide rows; counts how many cells are hidden.
- Group — auto-categorise (above) vs. linear declaration order.
- Density — normal three-column grid vs. compact one-line-per-cell.
FK cells inside the row-details panel are clickable too — clicking pushes another row-node onto the tree without going through a popover (you are already inside a drill-down). Cmd/Ctrl-click opens the target in a new tab.
Editing cells from the Single-Row View
Each cell exposes a small Edit (pencil) affordance in its top-right corner on hover when the row has a known primary key. Clicking the pencil swaps the value for the same smart input the main data grid uses — FK row picker for FK columns, values peek for enum columns, TRUE / FALSE / NULL toggle for booleans, and a plain text input otherwise. Committing routes through the same quick-edit confirmation dialog as the main grid, so the SQL preview and Save / Cancel buttons are identical. Tables without a primary key don't show the pencil — there's no safe way to address the row for an UPDATE.

Lazy related-data sections
Below the row-details panel, every table that references this row (via a real or loose FK) gets its own collapsible Related Data section. Sections render synchronously from the schema cache — no SQL runs until you actually expand one. When you expand a section:
- A
COUNT(*)and aSELECT … LIMIT 4fire in parallel. - A spinner appears in the section body while the query runs.
- Result rows are cached for re-expansion within the same row visit.
- Each section header gains a primary Open button (drill into the related table, filtered by the parent PK) and a … menu with Open in new explorer and Open in query editor.
Expand all opens every section at once, with concurrency capped at six in-flight queries so rows with 40+ inbound relations don't hammer the database.
Mini-grid icon column
Each expanded Related Data section renders a small read-only grid (the mini-grid) with a new leftmost icon column — a narrow sticky column with a ChevronRight per row. Click an icon to drill straight into that record's Single-Row View. Right-click a row for the matching context menu (Open record / Open in new explorer / Open in query editor). Cmd/Ctrl-click opens the target in a new tab.
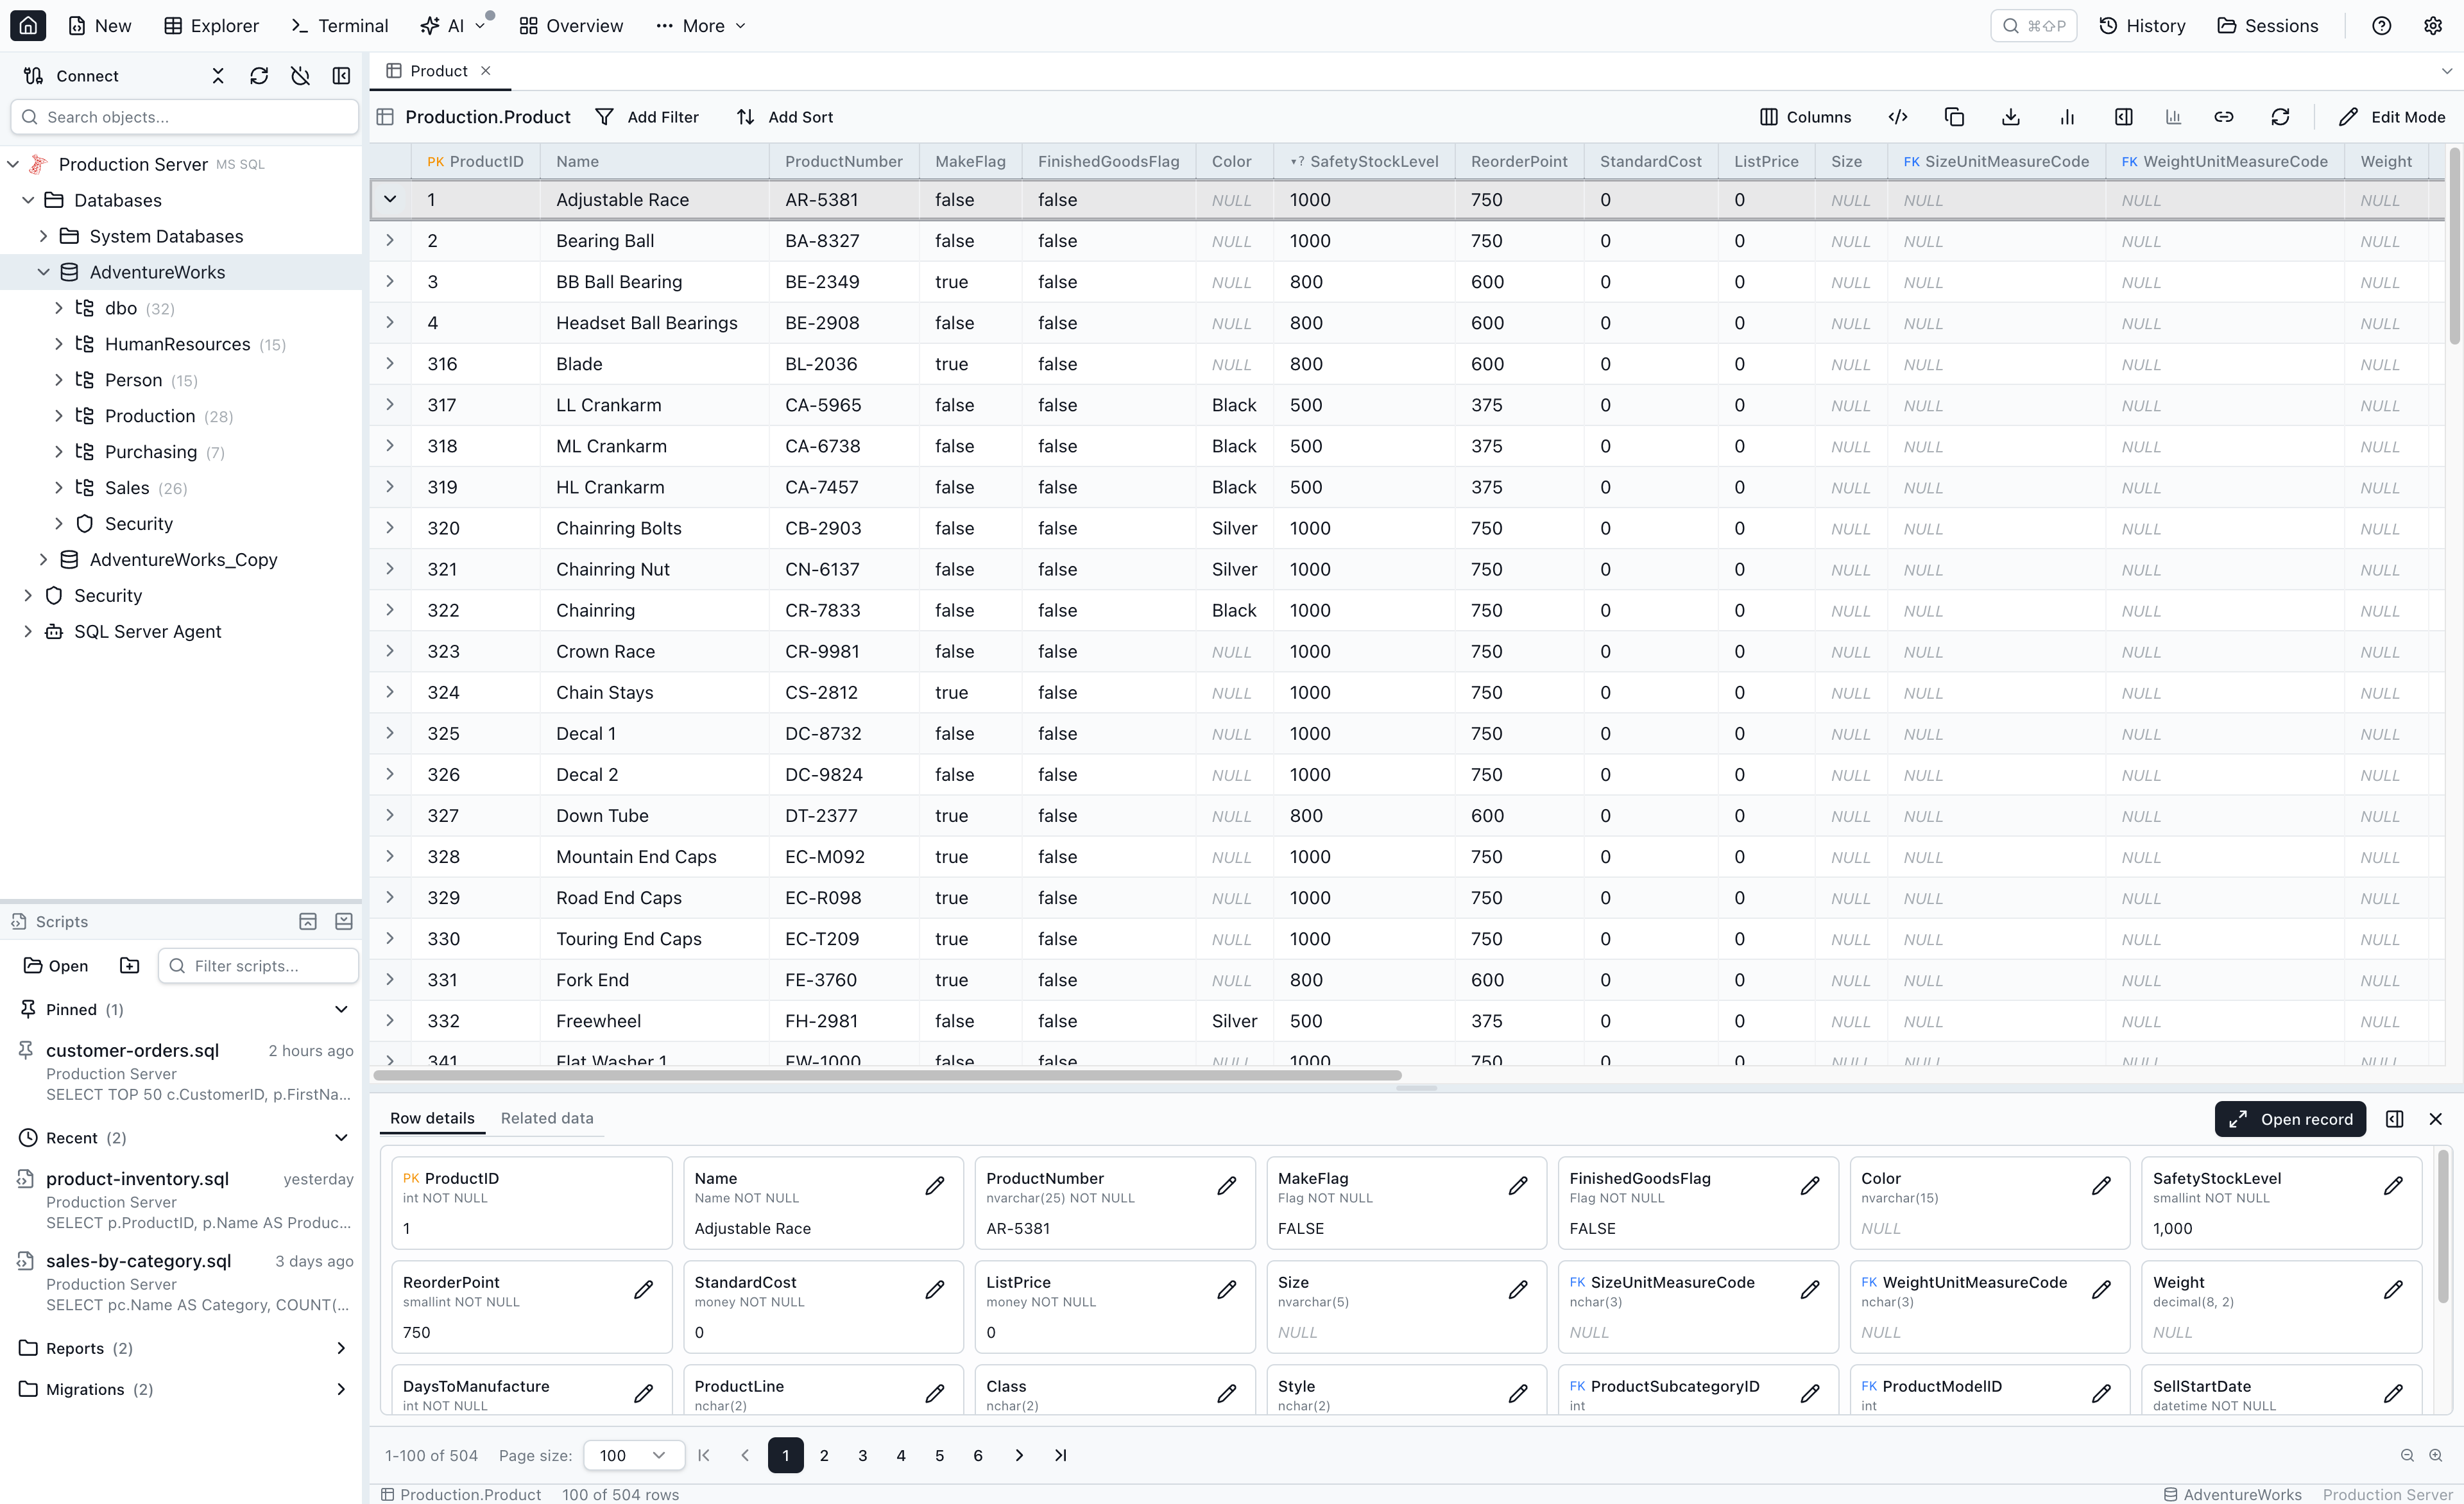
The inline row panel — Open record
The existing inline row-expansion panel (the bottom panel with Row Details and Related Data tabs that appears when you toggle a row's chevron) keeps working as a fast peek. It now gains a primary Open record button (with the Maximize2 icon) on the right of the tab strip, before the layout toggle and the close button. Clicking it promotes the inline peek into the full Single-Row View — the row's chevron collapses and the workspace takes over.
Loose foreign keys are first-class hops
Loose foreign keys — user-declared column-to-column references that the database doesn't enforce — navigate identically to real FKs. The peek popover, the breadcrumb chip, the Related Data sections, the mini-grid icon column, and the keyboard shortcuts all treat loose FKs as ordinary hops. Loose-FK relationships in the Related Data list show a small (loose) label so you can tell which references are user-declared, but the click behaviour is the same. See Navigating loose foreign keys for the cross-link.
Join-table collapse
Pure m2m join tables — tables whose only job is to link two other tables — are auto-collapsed from the breadcrumb. Navigating orders → order_items → products shows up as orders › products in the chip-row, with the order_items hop hidden. Jam SQL Studio uses a conservative heuristic: a table is treated as a pure join when it has exactly two outbound FKs, no inbound FKs, and a primary key composed of those FK columns (or a surrogate id with a unique index on the two FK columns).
Right-click any chip and pick Show join tables to override the heuristic per table — the override is stored in MetaInfo as joinTableHint: 'collapse' | 'expand' | 'auto' and travels with the rest of the per-database metadata.
Keyboard shortcuts
Four shortcuts walk the breadcrumb tree without taking your hands off the keyboard:
| Action | macOS | Windows / Linux |
|---|---|---|
| Activate previous sibling (or previous in active path) | Cmd+← | Ctrl+← |
| Activate next sibling (or next in active path) | Cmd+→ | Ctrl+→ |
| Activate parent | Cmd+↑ | Ctrl+↑ |
| Activate first child | Cmd+↓ | Ctrl+↓ |
All four are rebindable from Settings → Keybindings, and the full reference also lives on the Keyboard Shortcuts page.
Reverting to new-tab behaviour
If you prefer the old "every click opens a new tab" model, open Settings → Behavior → FK 'Open' default and switch from Drill in current tab to Open in new tab. The setting affects what the primary Open button does in the FK peek popover; the … menu's Open in new explorer is always available regardless of the default.
Exporting Data
Export the current view to various formats for use in other applications:
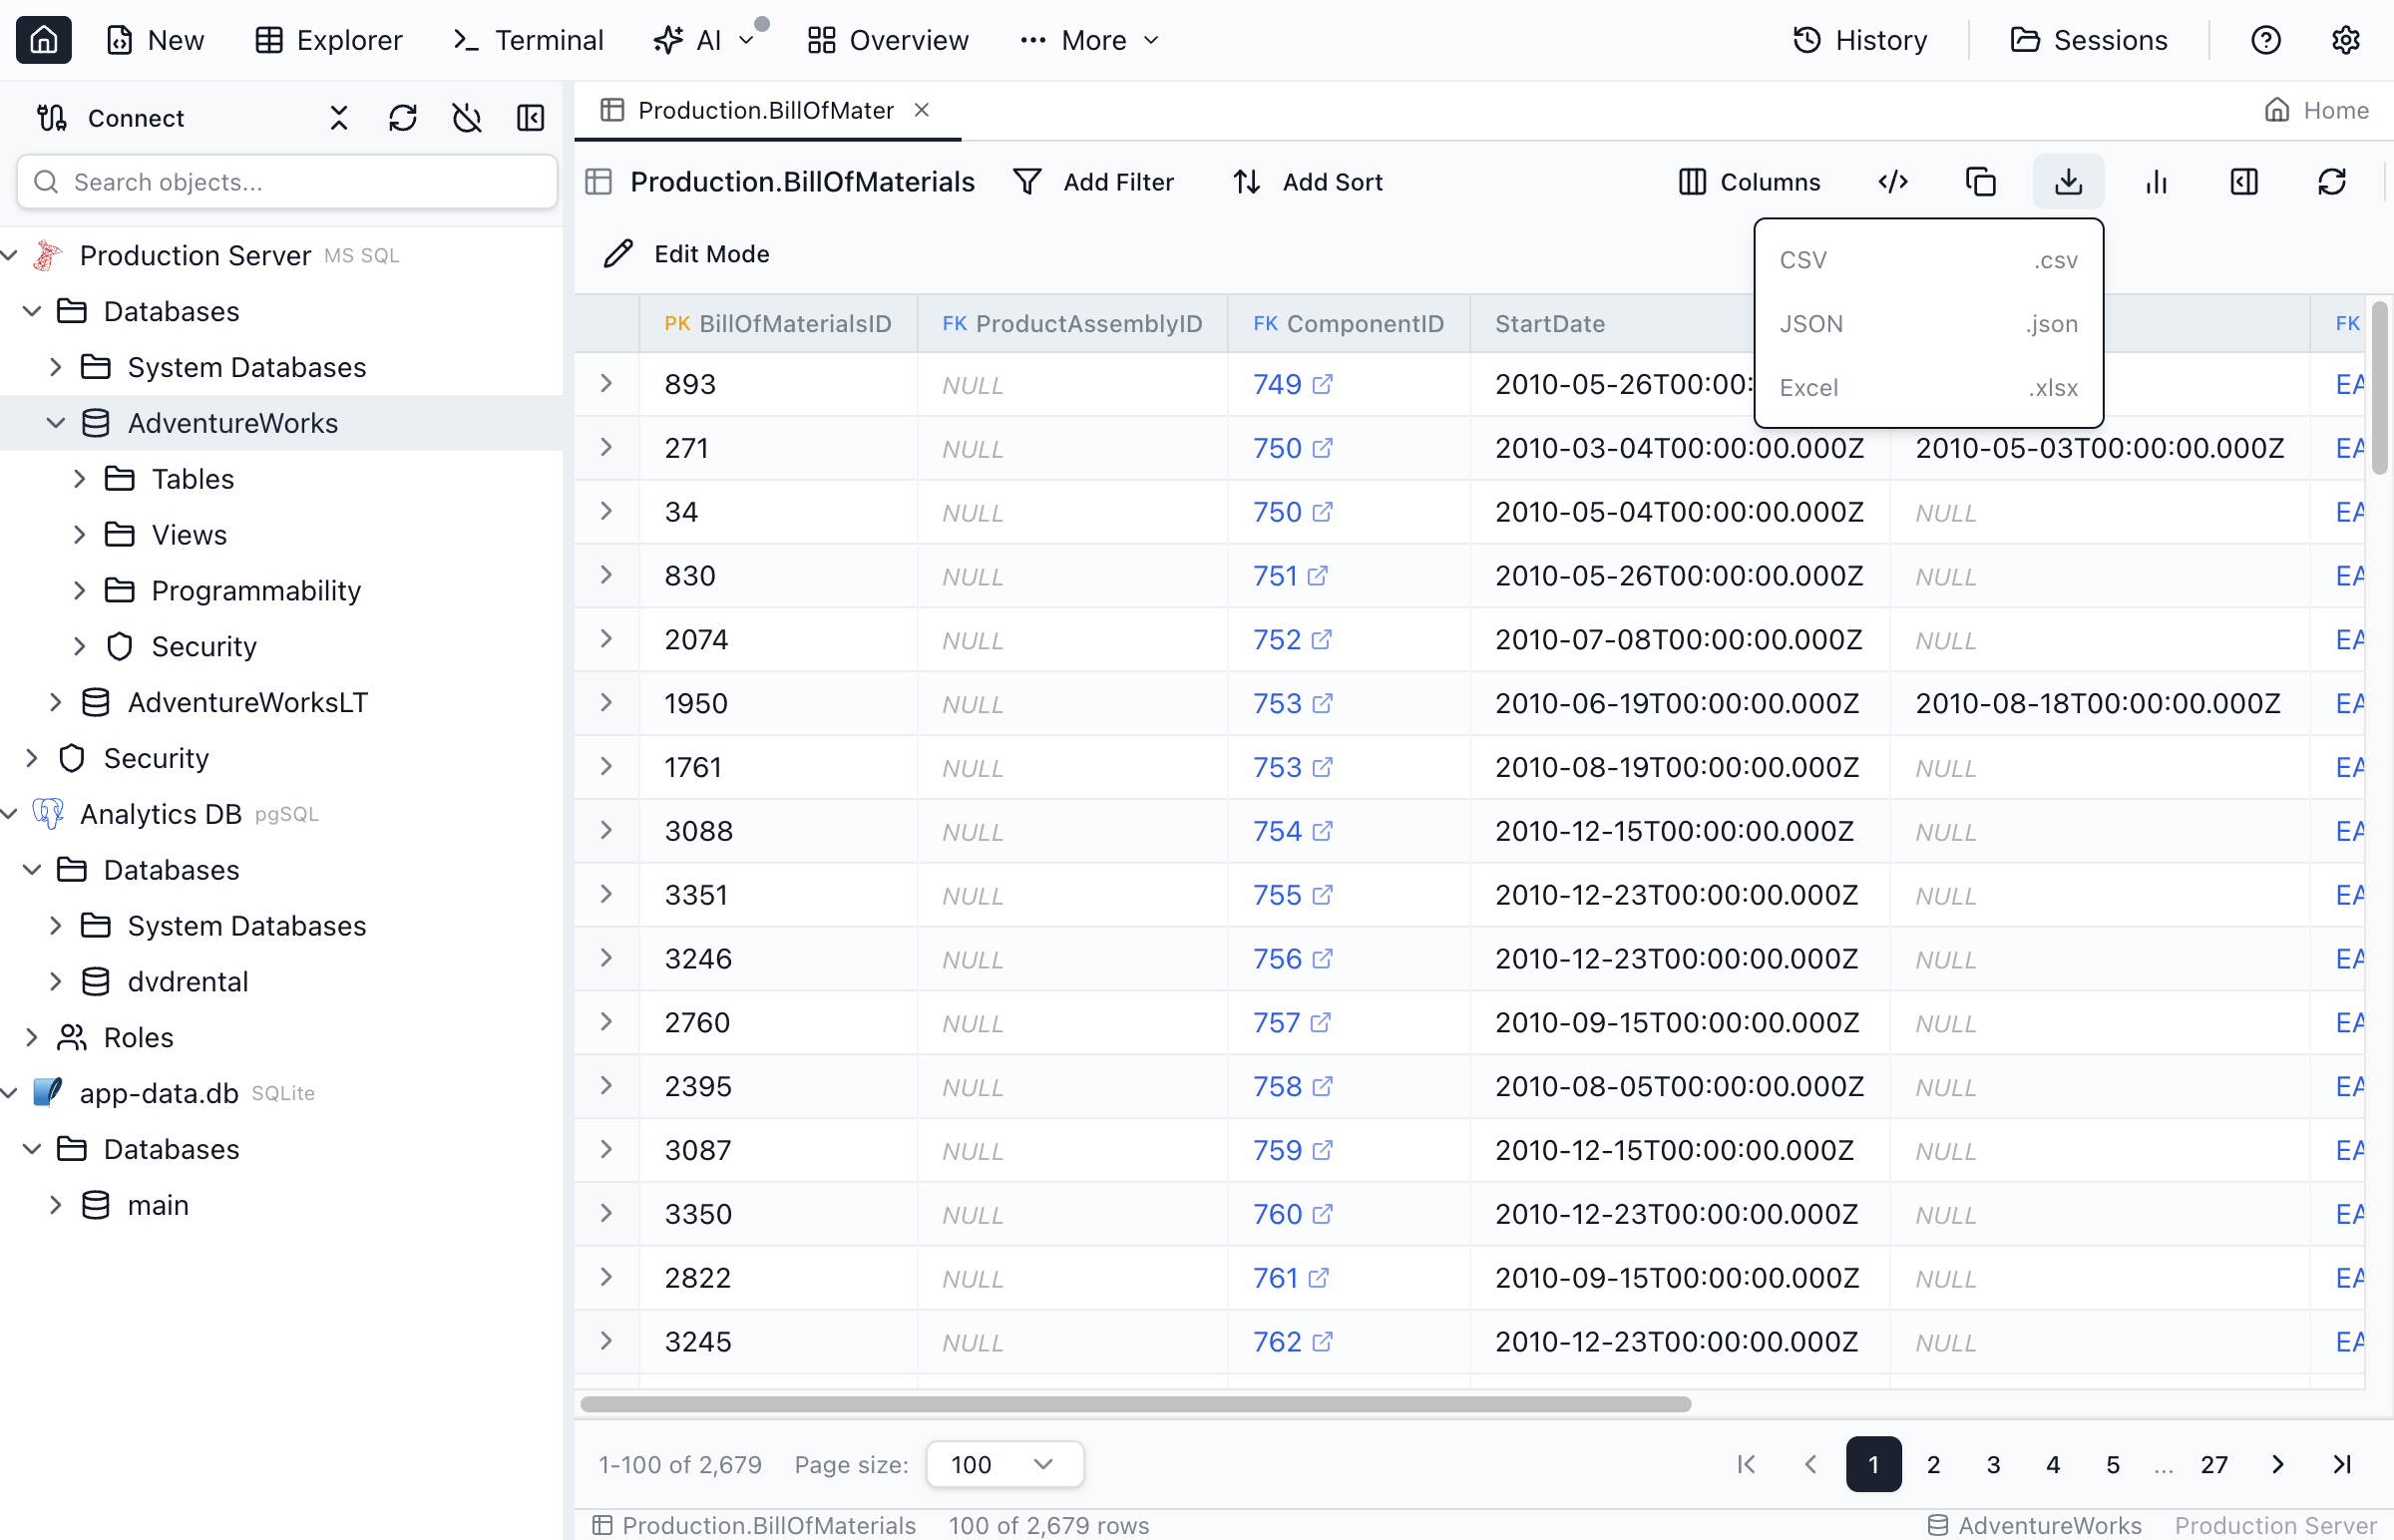
Export Formats
- CSV - Comma-separated values, opens in spreadsheets
- JSON - JavaScript Object Notation, useful for APIs and scripts
- Excel - Native .xlsx format with proper data types
Export Scope
- Current grid view - Exports the currently loaded rows and the currently visible columns
Keyboard Shortcuts
Navigate and edit efficiently with these shortcuts:
| Action | macOS | Windows/Linux |
|---|---|---|
| Edit selected cell | F2 | F2 |
| Confirm edit | Enter | Enter |
| Cancel edit | Escape | Escape |
| Delete selected rows | Delete | Delete |
| Copy cells | Cmd+C | Ctrl+C |
| Select all | Cmd+A | Ctrl+A |
| Navigate cells | Arrow keys | Arrow keys |
| Save changes | Cmd+S | Ctrl+S |
| Refresh data | Cmd+R | Ctrl+R |
Frequently asked questions
How do I open a table in Table Explorer?
Right-click any table in the Object Explorer and select 'Select Top 1000' or 'Edit Top 200' to open it in Table Explorer. You can also click the Table Explorer button in the toolbar and select a database and table.
Can I filter data in Table Explorer?
Yes, Table Explorer has a powerful filter panel. Click the filter icon to add conditions using operators like =, <, >, LIKE, BETWEEN, IS NULL, and more. Multiple filters are combined with AND logic.
How do I edit table data in Jam SQL Studio?
Enable edit mode by clicking the Edit button or using 'Edit Top 200' from the context menu. Then click any cell to edit its value. Remember to click Save to commit changes to the database. Tables must have a primary key to enable editing.
Can I add new rows to a table?
Yes, in edit mode you can click the Add Row button to insert a new blank row. Fill in the values and click Save to insert the row into the database.
What export formats does Table Explorer support?
Table Explorer can export data to CSV, JSON, or Excel (.xlsx). Click the Export button and choose your preferred format.
Ready to Explore Your Data?
Download Jam SQL Studio and start browsing and editing table data with ease.